
Fluffy Easter Bunny Cinnamon Rolls Recipe – Fun Holiday Treat!
Springtime brings delightful treats that spark joy, and these soft, fluffy easter bunny cinnamon rolls capture the essence of seasonal magic.
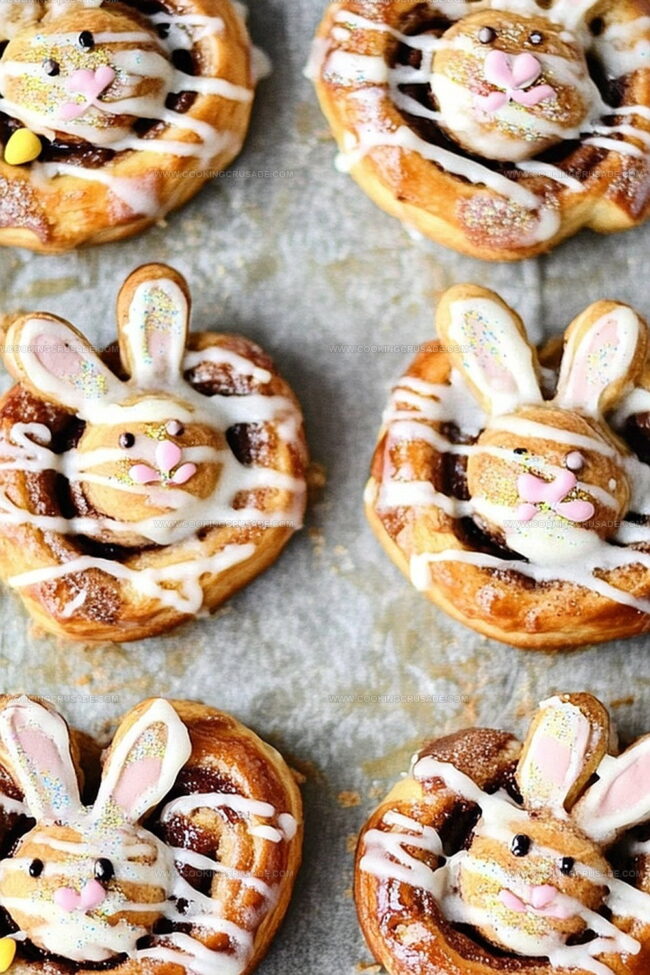
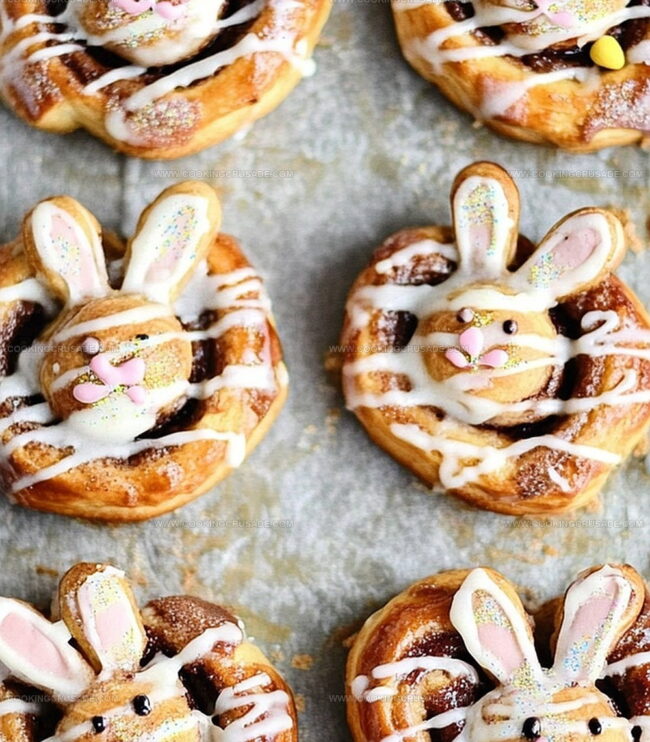
Shaped like adorable little bunnies, these pastries will melt hearts at any gathering.
Delicate swirls of warm cinnamon dance through each tender bite, promising pure comfort.
Sweet aromas will drift through your kitchen, enticing everyone near.
The playful bunny design transforms simple rolls into a festive celebration of Easter.
Decorated with love and care, these rolls blend whimsy and deliciousness in every charming shape.
Prepare to delight your loved ones with this irresistible Easter morning treat.
Quick Recipe Overview
Everything In Easter Bunny Cinnamon Rolls
For Dough Base:For Filling Flavor:For Topping and Decoration:Tools To Shape Easter Bunny Cinnamon Rolls
Steps To Bake Easter Bunny Cinnamon Rolls
Whip up a soft, pillowy dough by blending flour, sugar, yeast, and salt in a big mixing bowl. Splash in warm milk, melted butter, and an egg. Knead the mixture until it becomes smooth and elastic. Let the dough rest and rise in a cozy spot for about an hour.
Whisk together a delightful filling of butter, brown sugar, and cinnamon. Roll out the puffy dough into a wide rectangle. Spread the sweet mixture generously across the surface. Carefully roll the dough and slice into six adorable portions. Gently unfurl the top of each roll to create cute bunny ears. Allow the rolls to puff up for another 20-30 minutes.
Warm up the oven to a toasty 350F. Slide the bunny rolls inside and bake until they turn a gorgeous golden brown. Prepare a silky glaze by mixing powdered sugar, milk, and vanilla. Once baked, drizzle the glaze over the warm rolls. Add playful touches with mini chocolate chips for eyes, a pink candy for a cute nose, and a sprinkle of coconut to create a fluffy bunny tail.
Cute Tips For Easter Bunny Cinnamon Rolls
Serve Easter Bunny Cinnamon Rolls Warm And Fun
Store Easter Bunny Cinnamon Rolls The Easy Way
Print
Adorable Easter Bunny Cinnamon Rolls Recipe
- Total Time: 2 hours 10 minutes
- Yield: 13 1x
Description
Delightful Easter bunny cinnamon rolls bring spring cheer to breakfast tables. Fluffy pastry twists into adorable rabbit shapes, delighting families with sweet morning magic.
Ingredients
- 1 packet (2.25 teaspoons / 11 ml) instant yeast
- 3.25 cups / 780 ml all-purpose flour
- 0.25 cup / 50 g granulated sugar
- 0.5 teaspoon / 2.5 g salt
- 0.75 cup / 180 ml warm milk (about 110°F/43°C)
- 0.25 cup / 57 g unsalted butter, melted
- 1 large egg
- 0.5 cup / 113 g unsalted butter, softened
- 0.5 cup / 110 g brown sugar, packed
- 1.5 tablespoons / 22 ml ground cinnamon
- 1 cup / 120 g powdered sugar
- 2 tablespoons / 30 ml milk
- 0.5 teaspoon / 2.5 ml vanilla extract
- Mini chocolate chips or raisins (for eyes)
- Pink sprinkles or M&Ms (for nose)
- Shredded coconut (for a fluffy bunny tail)
Instructions
- Prepare the Dough Base: In a large mixing bowl, thoroughly combine flour, sugar, yeast, and salt. Create a central depression and pour in warm milk, melted butter, and beaten egg. Blend ingredients until a unified dough emerges. Knead the mixture on a clean surface for 6-7 minutes, developing a smooth, pliable consistency. Transfer to a warm, covered location and allow to rise for approximately one hour.
- Craft the Filling and Shape: Blend softened butter, brown sugar, and cinnamon into a homogeneous mixture. Roll the expanded dough into a rectangular shape on a lightly floured surface. Spread the cinnamon mixture evenly across the dough. Roll tightly from the long edge and slice into six equal portions. Position each roll on a prepared baking sheet, carefully unfolding the top to create distinctive bunny ear shapes. Let the rolls rest and slightly rise for 25-30 minutes.
- Bake and Decorate: Preheat the oven to 350F (175C). Bake the bunny-shaped rolls until they turn a rich golden-brown, about 20 minutes. While cooling, whisk powdered sugar, milk, and vanilla into a smooth glaze. Once slightly cooled, generously drizzle the glaze over the rolls. Add playful details using mini chocolate chips for eyes, a pink candy for a nose, and sprinkled coconut to create a fluffy tail effect.
Notes
- Precise Dough Kneading: Work the dough consistently for 6-7 minutes to develop proper gluten structure, ensuring a soft and elastic texture that will create perfectly tender rolls.
- Temperature Control for Rising: Place the dough in a warm, draft-free area around 80-85°F to achieve optimal yeast activation and consistent rising without drying out the surface.
- Ear Shaping Technique: When creating bunny ears, use a sharp knife or kitchen scissors to make clean, precise cuts, gently pulling and shaping to maintain the delicate bunny silhouette.
- Glaze Application Timing: Allow rolls to cool slightly before adding glaze to prevent immediate melting and ensure a beautiful, smooth coating that sets attractively on the surface.
- Prep Time: 20 minutes
- Cook Time: 20 minutes
- Category: Breakfast, Snacks, Desserts
- Method: Baking
- Cuisine: American
Nutrition
- Serving Size: 13
- Calories: 320
- Sugar: 17 g
- Sodium: 150 mg
- Fat: 14 g
- Saturated Fat: 8 g
- Unsaturated Fat: 6 g
- Trans Fat: 0 g
- Carbohydrates: 42 g
- Fiber: 1 g
- Protein: 4 g
- Cholesterol: 35 mg
Olivia Bennett
Co-Founder & Content Creator
Expertise
Nutritional Analysis, Dietary Accommodations, Food Writing and Blogging,
Education
University of Texas at Austin
Institute of Culinary Education, New York, NY
Olivia Bennett is Cooking Crusade’s go-to expert for nutritious, feel-good food. Based in Austin, she blends her degree in Nutrition from the University of Texas with plant-based culinary training from the Institute of Culinary Education.
Olivia’s recipes are all about balance: vibrant, wholesome, and easy-to-love dishes that work for all kinds of eaters. Her mission is simple: to make healthy eating approachable and genuinely tasty, with tips that support your lifestyle, not complicate it.