
Homemade Chewy Brownie Ice Cream Sandwiches Recipe – Sweet Bliss!
Chocolate cravings hit differently when these delectable brownie ice cream sandwiches enter the scene.
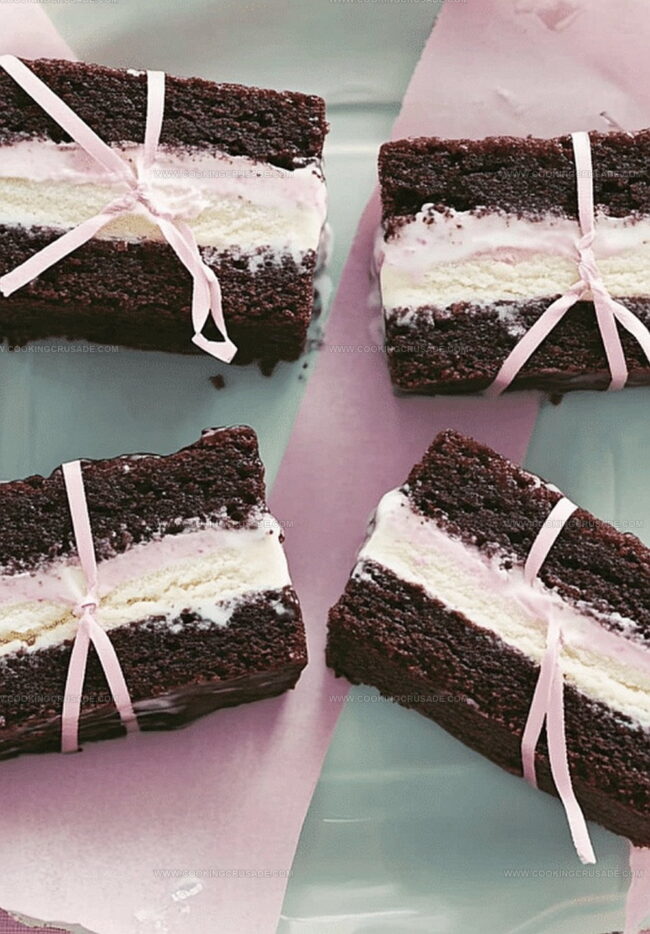
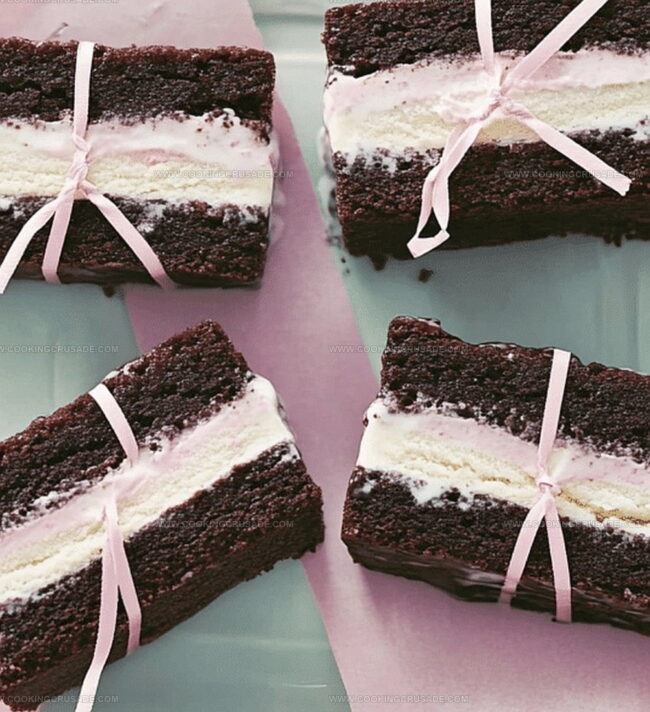
Rich, fudgy brownies embrace creamy frozen goodness in a handheld treat that feels pure magic.
Nobody can resist the decadent combination of warm chocolate and cool, silky ice cream.
Each bite promises a textural adventure that dances between soft and crisp edges.
The homemade approach guarantees maximum satisfaction compared to store-bought alternatives.
Summer afternoons beg for these delightful sweet squares that melt slowly and dramatically.
Grab a napkin and prepare for an indulgent experience that will make you the neighborhood dessert hero.
Why Brownie Ice Cream Sandwiches Are Irresistible
What You Need for Fudgy Brownie Layers
Main Ingredients:
Brownie Base:Ice Cream Filling:Additional Components:
Preparation Aids:Assembly Instructions for These Cool Treats
Step 1: Prepare the Oven
Warm up your oven to 350 degrees Fahrenheit. Grab a square baking pan and line it with parchment paper, making sure some paper hangs over the edges for easy lifting.
Step 2: Create Chocolate Brownie Base
Gather your ingredients:Whisk the melted butter, sugar, and cocoa powder until they become a silky smooth mixture. Crack in the egg and splash of vanilla, mixing thoroughly. Gently fold in flour and salt, stirring just until everything combines. Don’t go crazy with mixing – you want a tender brownie!
Step 3: Bake the Brownie Layer
Pour the batter into your prepared pan, spreading it evenly. The layer will look thin, but that’s perfect! Slide the pan into the oven and bake for 10-12 minutes. You’re looking for a set but soft texture. Once done, let the brownie cool completely right in the pan.
Step 4: Transform Brownie into Sandwich Layers
After cooling, lift the brownie out using the parchment paper edges. Place on a flat surface and slice down the middle, creating two identical brownie sheets.
Step 5: Add Creamy Ice Cream Filling
Let your favorite ice cream sit out for a few minutes to soften slightly. Spread the ice cream generously over one brownie layer, smoothing it with a spatula. Gently place the second brownie layer on top, pressing down lightly.
Step 6: Freeze into Perfection
Wrap the entire sandwich tightly in plastic wrap or aluminum foil. Slide into the freezer and let it chill for at least two hours until completely firm.
Step 7: Slice and Enjoy
Remove from the freezer, unwrap, and slice into individual portions using a sharp knife. Serve immediately and watch everyone’s eyes light up with delight!
Tips to Keep Ice Cream Firm and Brownies Soft
How to Freeze Without Freezer Burn
Pairing Ideas for These Sweet Sandwiches
Cool Twists on This Classic Combo
Brownie Sandwich FAQs Answered
Absolutely! Feel free to experiment with any ice cream flavor you love. Chocolate, mint chocolate chip, or caramel would be delicious alternatives to create your perfect brownie ice cream sandwich.
No special equipment needed! Just a standard 9×9 inch baking pan, parchment paper, mixing bowl, and a basic whisk or spatula will do the trick. Most home bakers already have these items in their kitchen.
The key is to slightly underbake the brownies. Remove them from the oven when they’re just set but still soft. This ensures a fudgy, chewy texture that perfectly complements the creamy ice cream filling.
Yes! This recipe is great for kids to help with. They can assist in mixing the batter, spreading the ice cream, and even cutting the final sandwich. It’s a fun, simple dessert that the whole family can enjoy making together.
Print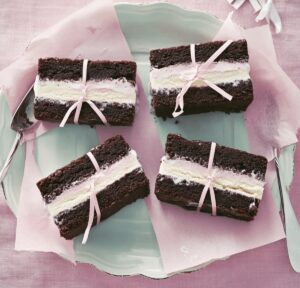
Chewy Brownie Ice Cream Sandwiches Recipe
- Total Time: 2 hours 27 minutes
- Yield: 12 1x
Description
Chewy Brownie Ice Cream Sandwiches bring pure indulgence between rich chocolate layers and creamy frozen delight. Cool summer memories melt together with each delectable bite, inviting you to savor a classic dessert reimagined.
Ingredients
Main Ingredients:
- 1 large egg
- ½ cup (115g) unsalted butter, melted
- ¾ cup (150g) granulated sugar
- ½ cup (65g) all-purpose flour
- ⅓ cup (35g) cocoa powder (unsweetened)
Additional Flavoring Ingredients:
- 1 teaspoon vanilla extract
- ¼ teaspoon salt
Filling:
- 1 pint (475 milliliters / 16 fluid ounces) of your favorite ice cream (vanilla, chocolate, or any flavor of choice)
Instructions
- Craft the Brownie Canvas
Prepare a 9-inch square baking vessel by lining it with parchment paper, ensuring generous overhangs for effortless extraction. Heat the oven to a precise 350F (175C), creating an ideal environment for brownie transformation.
- Blend Chocolate Alchemy
Whisk melted butter with granulated sugar and rich cocoa powder until a silky, uniform mixture emerges. Incorporate egg and vanilla extract, stirring until the batter achieves a glossy, harmonious consistency. Gently fold in flour and salt, maintaining a delicate touch to preserve the brownie’s tender texture.
- Bake the Chocolate Foundation
Distribute the batter evenly across the prepared pan, creating a thin, uniform layer. Slide into the preheated oven and bake for 10-12 minutes, watching for a set yet yielding surface. Allow the brownie to cool completely within the pan, developing its characteristic chew.
- Construct the Ice Cream Canvas
Carefully elevate the cooled brownie using parchment edges. Slice the sheet precisely in half, creating two equal rectangular platforms for the frozen filling.
- Layer Frozen Decadence
Liberate the ice cream from its frozen state, letting it soften slightly. Spread the creamy layer uniformly across one brownie base, using a spatula to create a smooth, even surface. Gently position the second brownie layer atop the ice cream, applying gentle pressure to secure the sandwich.
- Chill and Set
Encase the assembled creation in plastic wrap or aluminum foil, protecting it from freezer fluctuations. Allow it to hibernate in the freezer for a minimum of two hours, transforming into a solid, harmonious treat.
- Serve with Precision
Extract the frozen delicacy from its chilly chamber. Employ a sharp knife to slice into individual portions, revealing the layered masterpiece. Serve immediately or return to the freezer for future indulgence.
Notes
- Choose high-quality cocoa powder for rich, deep chocolate flavor that elevates the entire dessert.
- Use room temperature ingredients to ensure smooth, even mixing of the brownie batter without overmixing.
- Experiment with different ice cream flavors like mint chocolate chip, coffee, or salted caramel to create unique combinations.
- Line the baking pan carefully with parchment paper to prevent sticking and make removal effortless.
- Allow brownies to cool completely before adding ice cream to prevent melting and maintain structural integrity.
- Soften ice cream just enough to spread easily without becoming too runny, typically 5-10 minutes at room temperature.
- Wrap sandwiches individually in plastic wrap for easy storage and portion control in the freezer.
- For a gluten-free version, substitute regular flour with almond flour or a gluten-free baking blend.
- Create mini sandwiches by cutting the brownie into smaller squares for bite-sized treats perfect for parties.
- Use a hot knife when slicing frozen sandwiches to get clean, precise cuts without cracking the brownie layers.
- Prep Time: 15 minutes
- Cook Time: 12 minutes
- Category: Desserts, Snacks
- Method: Baking
- Cuisine: American
Nutrition
- Serving Size: 12
- Calories: 250
- Sugar: 18g
- Sodium: 150mg
- Fat: 12g
- Saturated Fat: 7g
- Unsaturated Fat: 4g
- Trans Fat: 0g
- Carbohydrates: 32g
- Fiber: 1g
- Protein: 3g
- Cholesterol: 30mg
James Mitchell
Founder & Recipe Developer
Expertise
Recipe Creation and Testing, Fusion Cuisine, Food Styling and Photography, Culinary Education
Education
Kendall College, Chicago, IL
The Culinary Institute of America, Hyde Park, NY
James Mitchell is the founder and fearless flavor explorer at Cooking Crusade. With a degree in Culinary Arts from Kendall College and advanced training in global gastronomy from The Culinary Institute of America, James has spent over a decade perfecting the art of recipe creation.
His background includes fine dining, private cheffing, and food styling, but his true joy comes from turning big ideas into doable recipes for home cooks. Every dish he shares is a mix of creativity, culture, and a little kitchen magic, built to bring excitement back to everyday meals.