
The Sweetest Copycat Little Debbie Valentine Cakes Recipe Ever
Memories of childhood snack times come flooding back with these delightful Little Debbie Valentine cakes that capture pure nostalgia.
Sweet moments from school lunches dance in your mind when you see these charming treats.
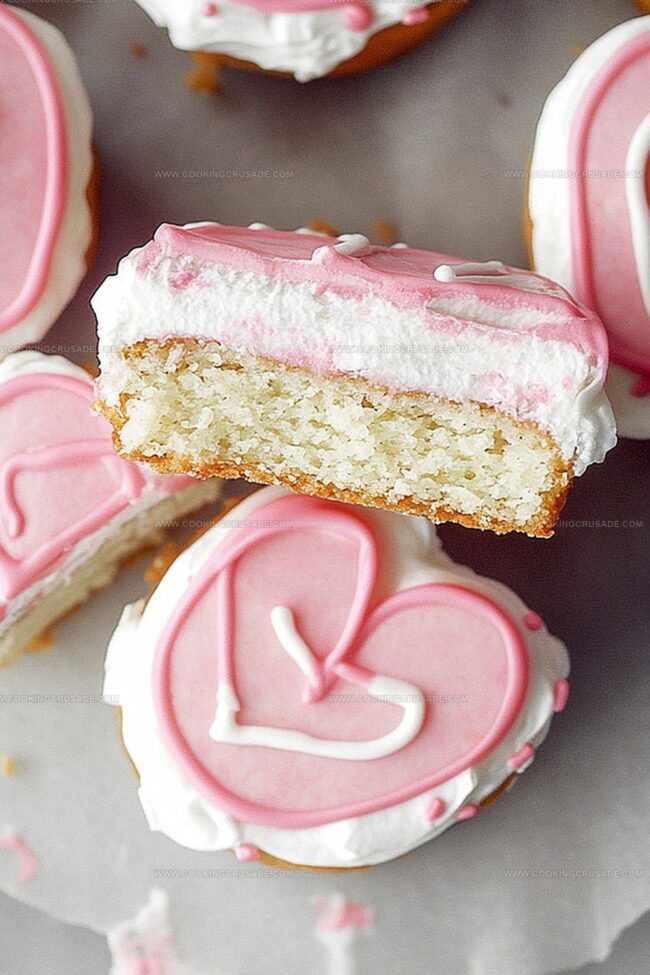
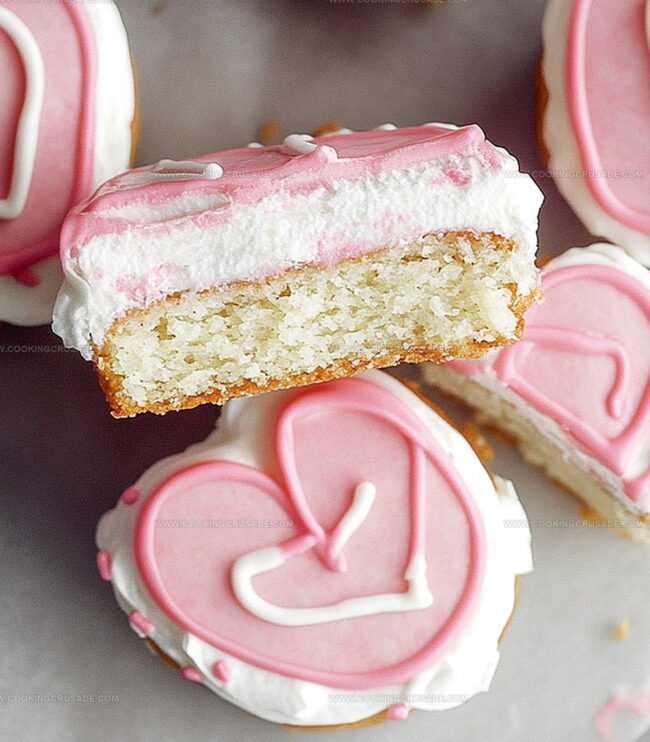
Soft pink frosting and delicate heart shapes make these copycat desserts absolutely irresistible.
Each bite promises a perfect blend of tender cake and creamy filling that feels like a warm hug.
Baking these treats lets you recreate those magical after-school memories right in your kitchen.
The simple ingredients transform into something magical with just a few easy steps.
Surprising your loved ones with these adorable homemade sweets that taste exactly like the classic store-bought version.
Grab your mixing bowl and let’s make some delicious memories together!
Why Copycat Little Debbie Valentine Cakes Are Fun
What You’ll Need For Copycat Little Debbie Valentine Cakes
Cake Base Ingredients:Wet Cake Ingredients:Filling and Coating Ingredients:How To Make Copycat Little Debbie Valentine Cakes
Step 1: Prepare Cake Batter
Preheat the oven to 350°F (175°C). Grab a 9×13-inch baking pan and line it with parchment paper, giving it a light spray of cooking oil. Gather your dry ingredients:In a separate large mixing bowl, whip together:Beat until the mixture looks fluffy and light. Add eggs one by one, mixing thoroughly after each. Splash in vanilla extract for extra flavor. Gradually mix in dry ingredients and buttermilk, alternating between the two. Drop in red gel food coloring to create a vibrant pink shade. Pour the batter into the prepared pan, spreading it evenly. Slide the pan into the oven and bake for 18-20 minutes. Check doneness by inserting a toothpick – it should come out clean. Let the cake cool completely.
Step 2: Whip Up Creamy Filling
In a clean mixing bowl, beat butter until it becomes smooth and creamy. Slowly incorporate powdered sugar, mixing until silky. Add a splash of vanilla extract and heavy cream. Whip everything together until the filling becomes light and fluffy.
Step 3: Shape and Fill Cake Hearts
Once the cake has cooled, grab a heart-shaped cookie cutter. Carefully cut out heart shapes from the cake – you should get around 12 hearts. Take half of the hearts and spread or pipe the creamy filling on top. Gently place the remaining hearts on top, creating adorable cake sandwiches. Pop these into the refrigerator for 20 minutes to help them firm up.
Step 4: Create Chocolate Coating
Melt white chocolate or white candy melts in a microwave-safe bowl. Heat in short 20-second bursts, stirring between each interval until smooth and glossy. Dip each heart cake into the melted chocolate, ensuring complete coverage. Place the coated cakes on a parchment-lined tray. For an extra touch of sweetness, melt pink or red candy melts and drizzle them over the tops.
Step 5: Final Touches
Allow the chocolate coating to set completely. This can happen at room temperature or you can speed up the process in the refrigerator. Once set, these Valentine treats are ready to delight and impress!
Pro Tips For Copycat Little Debbie Valentine Cakes
How To Keep Copycat Little Debbie Valentine Cakes Fresh
Pairing Ideas For Copycat Little Debbie Valentine Cakes
Ways To Change Copycat Little Debbie Valentine Cakes
Questions About Copycat Little Debbie Valentine Cakes
These cakes are a homemade version of the beloved Little Debbie Valentine Cakes, featuring a soft pink cake, creamy filling, and a white chocolate coating that brings childhood nostalgia to life.
Absolutely! You can prepare the cake layers and filling a day in advance. Just keep the assembled cakes refrigerated and coat them with chocolate just before serving to maintain their fresh texture.
Use a clean, sharp heart-shaped cookie cutter and press firmly into the cooled cake. Make sure the cake is completely cool to prevent crumbling and ensure clean, crisp edges.
No worries! You can use white chocolate chips or white chocolate baking bars as an alternative. Just melt them carefully and follow the same dipping process for a delicious coating.
Print
Copycat Little Debbie Valentine Cakes Recipe
- Total Time: 1 hour 20 minutes
- Yield: 12 1x
Description
Little Debbie valentine cakes bring nostalgic sweetness to homemade desserts. Red velvet sponge and cream cheese frosting create a delightful treat perfect for celebrating love with a classic American snack cake.
Ingredients
Cake Ingredients:
- 1 ¼ cups (156 grams) all-purpose flour
- 1 teaspoon baking powder
- ¼ teaspoon baking soda
- ¼ teaspoon salt
- ½ cup (113 grams) unsalted butter, softened
- ¾ cup (150 grams) granulated sugar
- 2 large eggs
- 1 teaspoon vanilla extract
- ½ cup (120 milliliters) buttermilk
- Red gel food coloring
Frosting Ingredients:
- ½ cup (113 grams) unsalted butter, softened
- 1 ½ cups (180 grams) powdered sugar
- 1 teaspoon vanilla extract
- 2 tablespoons (30 milliliters) heavy cream
Coating and Decoration:
- 12 ounces (340 grams) white chocolate or white candy melts
- 2 ounces (57 grams) pink or red candy melts (for decoration)
Instructions
- Prepare the cake foundation by preheating the oven and preparing the baking vessel with parchment paper and a light grease coating.
- Combine dry ingredients like flour, leavening agents, and salt in a separate mixing container.
- In a larger mixing bowl, thoroughly cream butter and sugar until achieving a light, airy consistency. Incorporate eggs individually, ensuring complete integration after each addition.
- Gently fold vanilla extract into the butter mixture, then systematically introduce dry ingredients and buttermilk, alternating between components to maintain a smooth batter texture.
- Introduce red gel food coloring to create a vibrant pink hue throughout the mixture.
- Transfer the batter into the prepared pan, distributing evenly and creating a uniform layer.
- Bake in the preheated oven until a testing implement emerges clean when inserted into the cake’s center, approximately 18-20 minutes.
- Allow the cake to cool completely at room temperature.
- Prepare the cream filling by whipping butter until achieving a creamy consistency.
- Gradually integrate powdered sugar, mixing until the filling becomes smooth and uniform.
- Enhance the filling with vanilla extract and heavy cream, whipping until light and fluffy.
- Utilize a heart-shaped cutting tool to extract cake hearts from the cooled base.
- Generously apply cream filling onto half of the cake hearts, creating sandwich-like configurations.
- Gently position complementary hearts atop the filled portions.
- Refrigerate the assembled cakes briefly to enhance structural integrity.
- Melt white chocolate or candy melts using controlled microwave intervals, stirring between heating cycles.
- Carefully immerse each cake heart into the melted coating, ensuring complete coverage.
- Position the coated hearts on a parchment-lined surface.
- Prepare pink or red candy melts for decorative drizzling.
- Embellish the coated hearts with artistic chocolate drizzles.
- Allow the chocolate coating to solidify completely at ambient temperature or within the refrigerator.
- Serve and enjoy the delicate valentine-themed confections.
Notes
- Ensure ingredients are at room temperature for smoother mixing and better cake texture.
- Avoid overmixing the batter to prevent a tough, dense cake by gently folding ingredients until just combined.
- Use gel food coloring for vibrant color without altering the cake’s consistency, and add gradually to achieve desired pink shade.
- Chill the cream filling briefly before piping to make it easier to handle and create neater sandwich cakes.
- For a gluten-free version, substitute all-purpose flour with a 1:1 gluten-free baking blend, maintaining the same measurements.
- Reduce sugar content by using alternative sweeteners like stevia or monk fruit, adjusting quantities to maintain moisture and sweetness.
- Create dairy-free options by replacing butter with coconut oil and using non-dairy milk or cream alternatives in the filling.
- Store assembled cakes in an airtight container in the refrigerator for up to 3 days, allowing them to come to room temperature before serving for best flavor and texture.
- Prep Time: 20 minutes
- Cook Time: 30 minutes
- Category: Desserts, Snacks
- Method: Baking
- Cuisine: American
Nutrition
- Serving Size: 12
- Calories: 320
- Sugar: 22 g
- Sodium: 150 mg
- Fat: 18 g
- Saturated Fat: 11 g
- Unsaturated Fat: 7 g
- Trans Fat: 0 g
- Carbohydrates: 38 g
- Fiber: 0 g
- Protein: 2 g
- Cholesterol: 55 mg
James Mitchell
Founder & Recipe Developer
Expertise
Recipe Creation and Testing, Fusion Cuisine, Food Styling and Photography, Culinary Education
Education
Kendall College, Chicago, IL
The Culinary Institute of America, Hyde Park, NY
James Mitchell is the founder and fearless flavor explorer at Cooking Crusade. With a degree in Culinary Arts from Kendall College and advanced training in global gastronomy from The Culinary Institute of America, James has spent over a decade perfecting the art of recipe creation.
His background includes fine dining, private cheffing, and food styling, but his true joy comes from turning big ideas into doable recipes for home cooks. Every dish he shares is a mix of creativity, culture, and a little kitchen magic, built to bring excitement back to everyday meals.