
Zesty Taco Cheese Ball Recipe: A Fun Party Showstopper!
Cheese balls bring pure joy to every gathering, and this creamy taco cheese ball recipe delivers a zesty twist that’ll have everyone coming back for more.
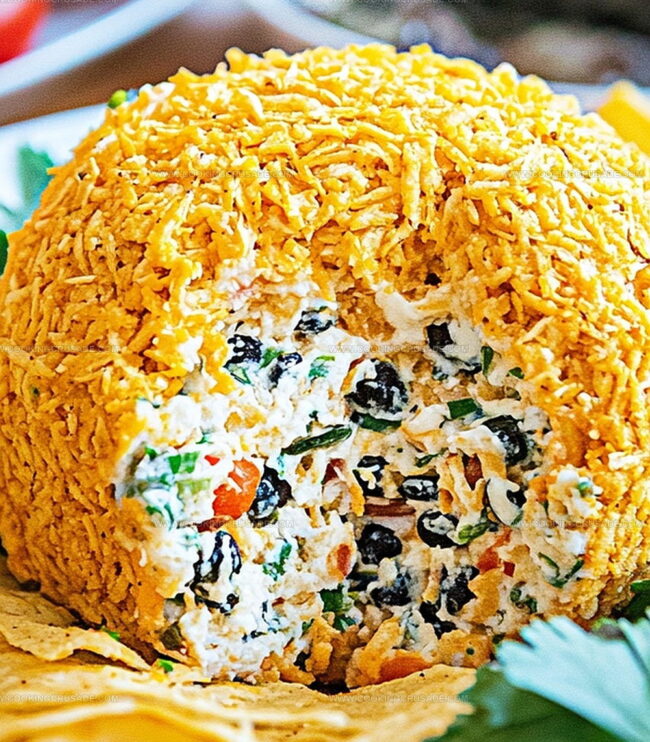
Packed with bold southwestern flavors, the appetizer combines smooth cream cheese with spicy seasonings and crisp toppings.
Tex-Mex lovers will absolutely adore this crowd-pleasing starter that takes minimal effort to prepare.
Jalapeños and taco seasoning infuse each bite with authentic southwestern charm.
Crisp tortilla chips or fresh vegetable sticks make the perfect companions for scooping up this delectable spread.
Serve this cheese ball at your next party, and watch it disappear in minutes, leaving your guests asking for the recipe.
Quick Recipe Overview

All You Need For Taco Cheese Ball
For Cheese Base:For Flavor Enhancers:For Coating and Garnish:Kitchen Gear For Taco Cheese Ball
Steps To Roll Taco Cheese Ball Just Right
Grab a mixing bowl and toss in softened cream cheese with a playful splash of zesty ingredients. Blend everything together until the mixture looks creamy and well-combined, creating a tantalizing base for your crowd-pleasing appetizer.
Scoop the mixture onto plastic wrap and gently shape it into a perfect round ball. Wrap it up snugly and let it chill in the refrigerator for a couple of hours, allowing the flavors to mingle and the texture to firm up.
In a separate dish, crush nacho chips into delightful, crispy bits. Sprinkle in some fresh herbs and optional crispy bacon pieces to add an extra layer of excitement to your cheese creation.
Carefully unwrap the chilled cheese ball and roll it through the crunchy coating. Press gently to ensure every inch gets covered in delicious crumbs and herbs.
Transfer your masterpiece to a serving platter, scatter some extra green onions for a pop of color. Surround it with tortilla chips, crisp crackers, or fresh veggie sticks, and watch your guests dive in with enthusiasm.
Ways To Change Up Taco Cheese Ball Flavor
Serve Taco Cheese Ball With Chips Or Crackers
Store Taco Cheese Ball In The Fridge
Print
Creamy Taco Cheese Ball Recipe
- Total Time: 2 hours 10 minutes
- Yield: 9 1x
Description
Mexican taco cheese ball brings zesty flavors to party appetizers. Crispy tortilla chips complement creamy, spiced cheese mixture that guests will devour quickly.
Ingredients
- 16 oz (454 g) cream cheese, softened
- 1.5 cups shredded Mexican cheese blend (cheddar + Monterey Jack)
- 0.5 cup sour cream
- 1 cup crushed nacho-flavored tortilla chips (like Doritos)
- 2 tablespoons taco seasoning (store-bought or homemade)
- 0.5 cup diced green onions
- 0.5 cup diced red bell pepper (or jalapenos for spice)
- 1 teaspoon garlic powder
- 1 teaspoon lime juice
- 0.25 cup chopped fresh cilantro
- 0.25 cup cooked and crumbled bacon (optional)
- Extra diced green onions for garnish
Instructions
- Preparation: Combine cream cheese, shredded cheese, taco seasoning, sour cream, green onions, bell pepper, garlic powder, and lime juice in a large mixing bowl. Blend thoroughly until the mixture achieves a smooth, uniform consistency.
- Shaping: Lay out plastic wrap and transfer the cheese mixture onto it. Carefully mold into a compact spherical shape, ensuring complete coverage and tight wrapping. Refrigerate for at least two hours or overnight to firm up and allow flavors to meld.
- Coating Preparation: Crush nacho chips into fine crumbs, then mix with chopped cilantro and crumbled bacon to create a flavorful, crunchy exterior coating.
- Finishing: Remove cheese ball from refrigerator and gently roll in the prepared coating, ensuring complete and even coverage. Transfer to a serving platter and garnish with additional green onion snippets.
- Serving: Arrange an assortment of dipping accompaniments like tortilla chips, crackers, or fresh vegetable slices around the cheese ball for an inviting presentation.
Notes
- Chill Thoroughly: Refrigerate the cheese ball for at least 2 hours, preferably overnight, to allow flavors to meld and improve structural integrity.
- Soften Ingredients: Ensure cream cheese is at room temperature for smooth, easy mixing without lumps or uneven texture.
- Customize Coating: Experiment with alternative coatings like crushed doritos, panko breadcrumbs, or toasted nuts for unique flavor and texture variations.
- Dietary Adaptations: Swap regular cream cheese for low-fat versions, use turkey bacon instead of regular bacon, or create a vegetarian option by omitting meat and adding extra spices.
- Prep Time: 10 minutes
- Cook Time: 2 hours
- Category: Appetizer, Snacks
- Method: Mixing
- Cuisine: Mexican
Nutrition
- Serving Size: 9
- Calories: 320
- Sugar: 2 g
- Sodium: 600 mg
- Fat: 24 g
- Saturated Fat: 12 g
- Unsaturated Fat: 8 g
- Trans Fat: 0 g
- Carbohydrates: 20 g
- Fiber: 1 g
- Protein: 9 g
- Cholesterol: 50 mg
Olivia Bennett
Co-Founder & Content Creator
Expertise
Nutritional Analysis, Dietary Accommodations, Food Writing and Blogging,
Education
University of Texas at Austin
Institute of Culinary Education, New York, NY
Olivia Bennett is Cooking Crusade’s go-to expert for nutritious, feel-good food. Based in Austin, she blends her degree in Nutrition from the University of Texas with plant-based culinary training from the Institute of Culinary Education.
Olivia’s recipes are all about balance: vibrant, wholesome, and easy-to-love dishes that work for all kinds of eaters. Her mission is simple: to make healthy eating approachable and genuinely tasty, with tips that support your lifestyle, not complicate it.