Irresistible Cheesy Beefy Rolls-Up Recipe for Family Fun
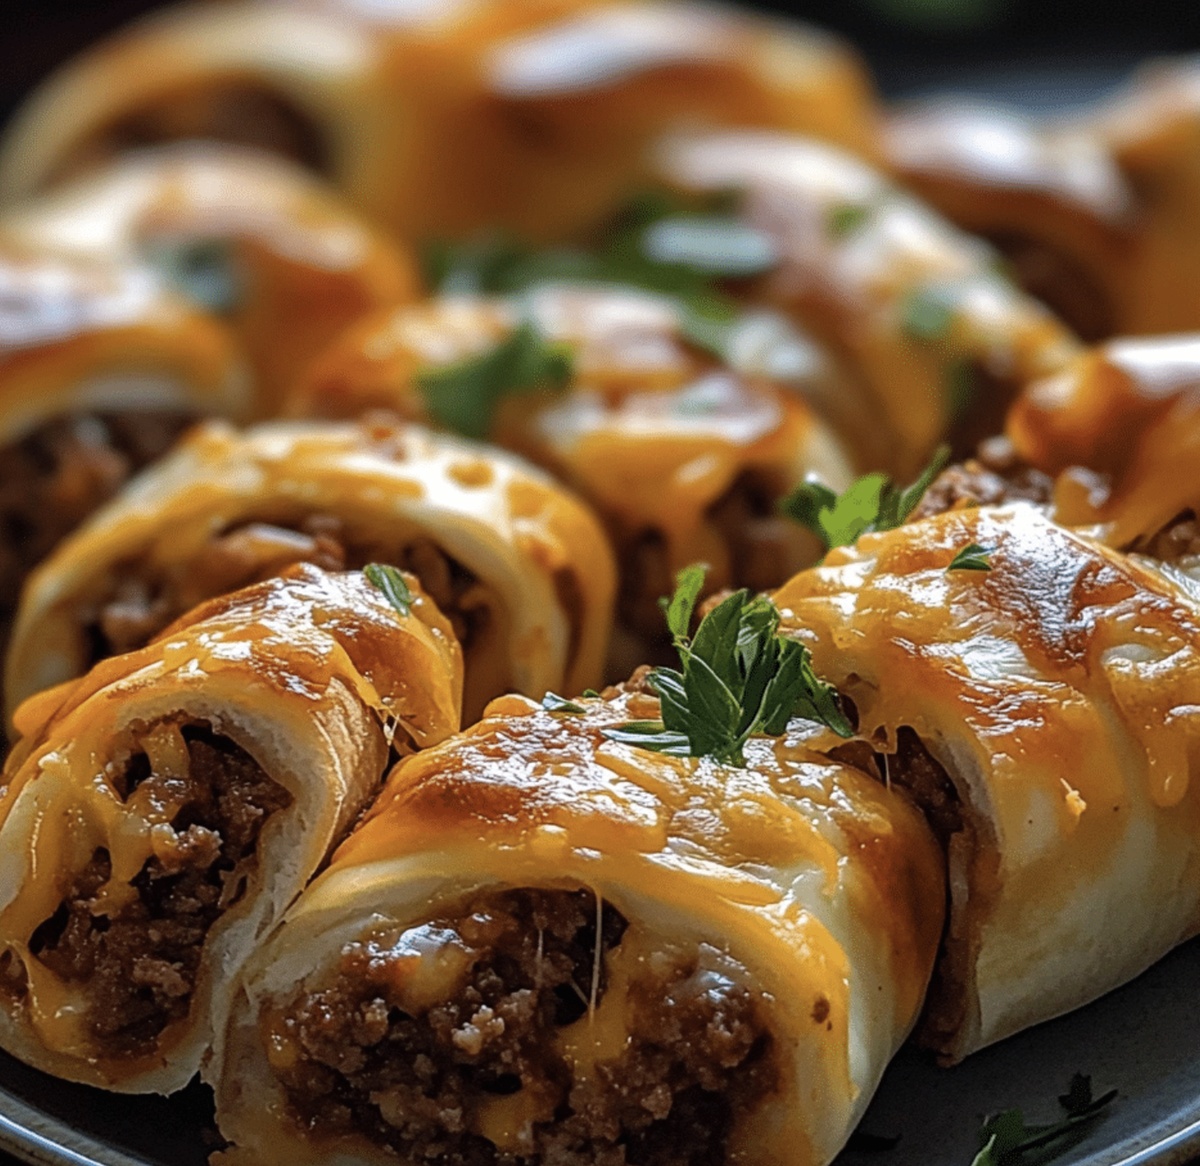
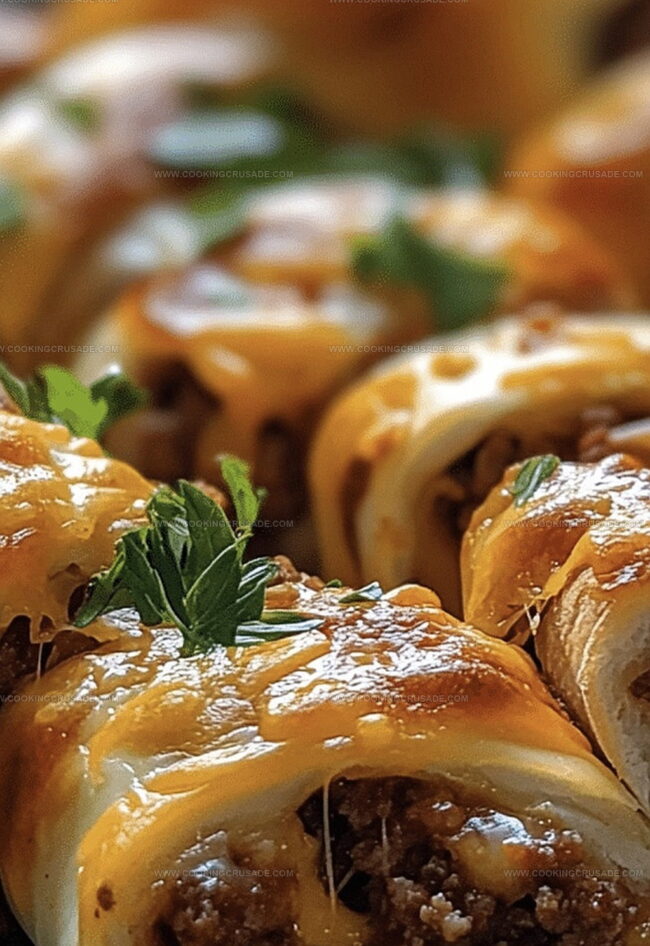
Rolled up with crispy cheesy beefy rolls-up, these delectable parcels promise a flavor explosion in every bite.
Savory beef mingles with melted cheese, creating a mouthwatering combination that’ll make taste buds dance.
Each roll captures the perfect balance of crunch and richness.
The golden-brown exterior gives way to a tender, juicy interior that screams comfort food.
Packed with robust seasonings and carefully selected ingredients, these rolls elevate a simple meal into a memorable feast.
You’ll find yourself reaching for seconds before the first bite is even finished.
Dive into this irresistible recipe that transforms ordinary ingredients into an extraordinary culinary experience.
Quick Recipe Overview
Ingredients List For Cheesy Beefy Rolls-Up
For Meat Base:For Seasoning and Moisture:For Wrapping and Binding:For Finishing and Enhancing:Tools To Prepare Cheesy Beefy Rolls-Up
Steps To Make Cheesy Beefy Rolls-Up Easily
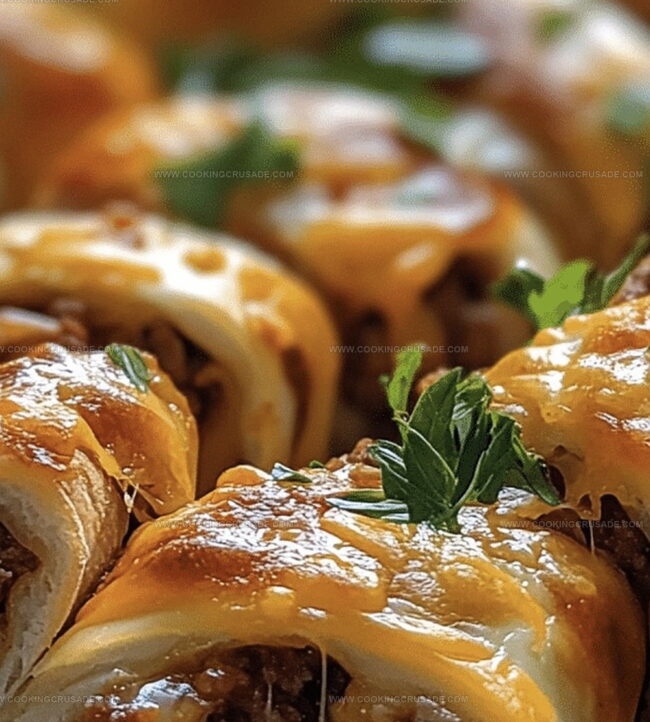
Brown ground beef with onions in a skillet until fully cooked. Splash in some garlic, zesty taco seasoning, and tomato sauce. Let the mixture bubble and meld flavors for a few minutes. Fold in melty cheese until everything blends beautifully.
Lay out soft tortillas on your workspace. Spoon the saucy beef mixture near one edge of each tortilla. Carefully roll each tortilla into a tight bundle, tucking the sides to keep the filling secure.
Heat the oven to a toasty 400F. Arrange the rolled bundles on a baking sheet, making sure they’re seam-side down. Give them a quick brush with melted butter to help them turn golden and crisp. Bake until they’re perfectly bronzed and sizzling, about 12-15 minutes.
Pull out your freshly baked rolls and dress them up with cool sour cream, tangy salsa, or creamy guacamole. Sprinkle some fresh herbs on top for a burst of color and flavor. Serve hot and watch them disappear!
Tips And Tricks For Cheesy Beefy Rolls-Up
Ways To Serve Cheesy Beefy Rolls-Up Quickly
How To Store Cheesy Beefy Rolls-Up Right
Print
Crispy Cheesy Beefy Rolls-Up Recipe
- Total Time: 25 minutes
- Yield: 5 1x
Description
Cheesy beefy rolls-up bring irresistible Mexican-inspired flavors to dinner tables across North America. Savory beef, melted cheese, and zesty spices roll together in these quick, satisfying appetizers that you’ll crave again and again.
Ingredients
- 1 lb (454 g) ground beef
- ½ cup shredded cheddar cheese
- ½ cup shredded Monterey Jack or mozzarella cheese
- 8 small flour tortillas (soft taco size)
- 1 packet taco seasoning
- 2 cloves garlic (minced)
- ½ cup onion (diced)
- 2 tbsps butter or oil (for brushing/baking or frying)
- ½ cup salsa or Rotel tomatoes
- Sour cream
- Salsa
- Queso dip
- Alternative homemade taco seasoning:
- 1 tsp chili powder
- ½ tsp cumin
- ½ tsp paprika
- ½ tsp garlic powder
- ½ tsp onion powder
- ¼ tsp salt
- Chopped cilantro or green onions (optional)
Instructions
- Meat Preparation: Sauté ground beef and onions in a skillet until thoroughly browned, then drain excess fat completely.
- Flavor Infusion: Incorporate minced garlic, taco seasoning, and salsa into the meat, allowing the mixture to simmer and develop rich flavors for 2-3 minutes.
- Cheese Integration: Remove skillet from heat and fold in melted cheese blend, ensuring even distribution throughout the filling.
- Tortilla Assembly: Lay tortillas flat, spread beef mixture along the bottom third, then tightly roll, carefully tucking in sides to create sealed parcels.
- Oven Preparation: Preheat oven to 400F (200C), line baking sheet with parchment paper, and arrange rolled tortillas seam-side down.
- Pre-Baking Technique: Brush exterior with melted butter to enhance crispiness and promote golden-brown coloration.
- Baking Process: Cook for 12-15 minutes, rotating midway to ensure uniform crispness and thorough heating.
- Serving Presentation: Plate the hot rolls alongside complementary sides like sour cream, salsa, queso, or guacamole.
- Final Touch: Garnish with freshly chopped cilantro or green onions to add a vibrant, aromatic finish to the dish.
Notes
- Control Meat Moisture: Pat ground beef dry before sautéing to prevent excess water and achieve perfect browning, ensuring a crispy and flavorful filling.
- Cheese Melting Technique: Use a blend of semi-soft and melting cheeses like cheddar and monterey jack for smooth, creamy consistency that binds the filling perfectly.
- Tortilla Selection Strategy: Choose fresh, flexible flour tortillas at room temperature to prevent cracking and ensure easy, tight rolling without breaking.
- Crispy Exterior Hack: Brush rolls with olive oil instead of butter for a lighter option that still provides golden-brown crispness and adds subtle flavor complexity.
- Prep Time: 10 minutes
- Cook Time: 15 minutes
- Category: Lunch, Snacks, Appetizer
- Method: Baking
- Cuisine: American
Nutrition
- Serving Size: 5
- Calories: 425
- Sugar: 2 g
- Sodium: 800 mg
- Fat: 25 g
- Saturated Fat: 12 g
- Unsaturated Fat: 10 g
- Trans Fat: 1 g
- Carbohydrates: 30 g
- Fiber: 2 g
- Protein: 24 g
- Cholesterol: 80 mg
Olivia Bennett
Co-Founder & Content Creator
Expertise
Nutritional Analysis, Dietary Accommodations, Food Writing and Blogging,
Education
University of Texas at Austin
Institute of Culinary Education, New York, NY
Olivia Bennett is Cooking Crusade’s go-to expert for nutritious, feel-good food. Based in Austin, she blends her degree in Nutrition from the University of Texas with plant-based culinary training from the Institute of Culinary Education.
Olivia’s recipes are all about balance: vibrant, wholesome, and easy-to-love dishes that work for all kinds of eaters. Her mission is simple: to make healthy eating approachable and genuinely tasty, with tips that support your lifestyle, not complicate it.