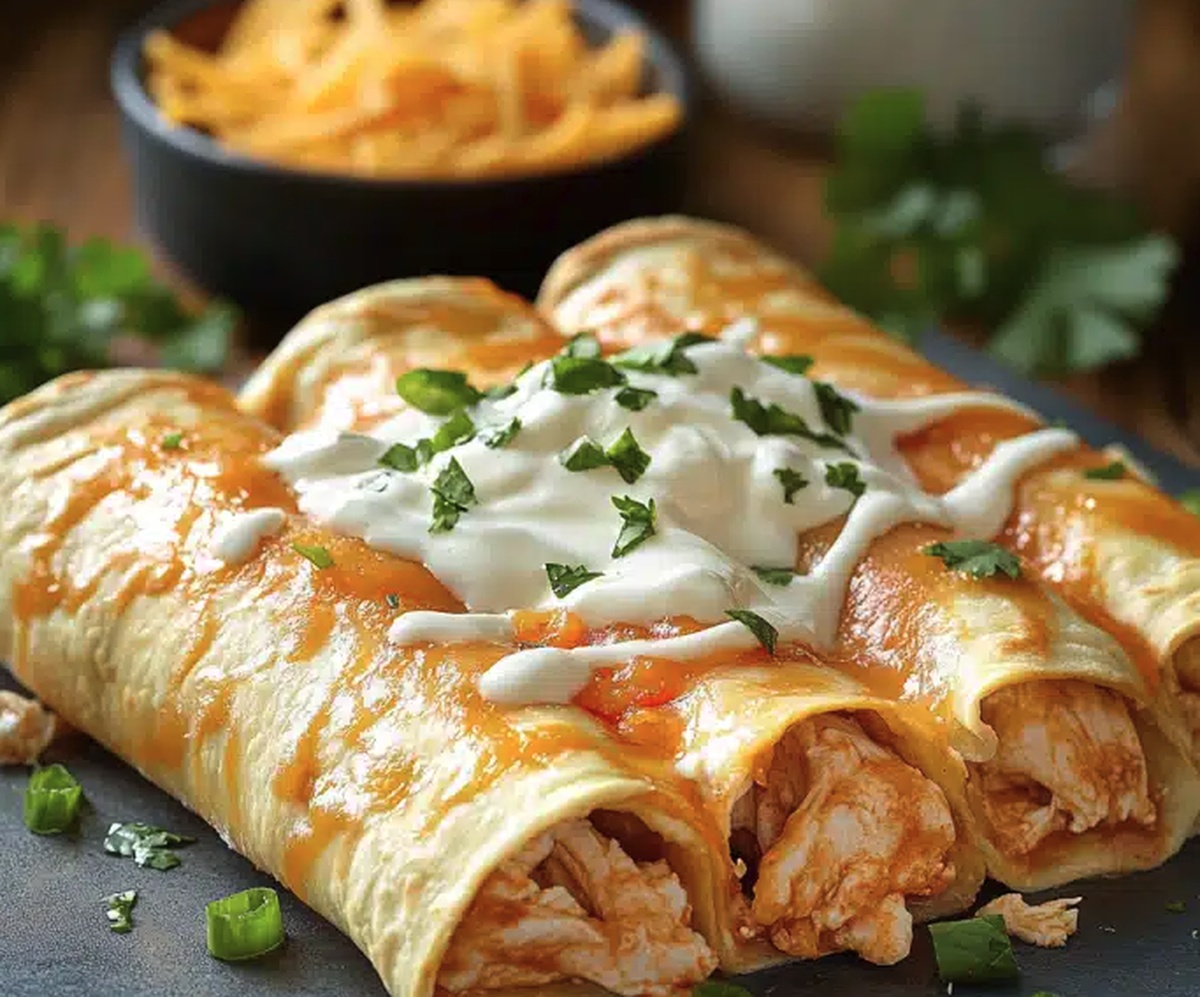
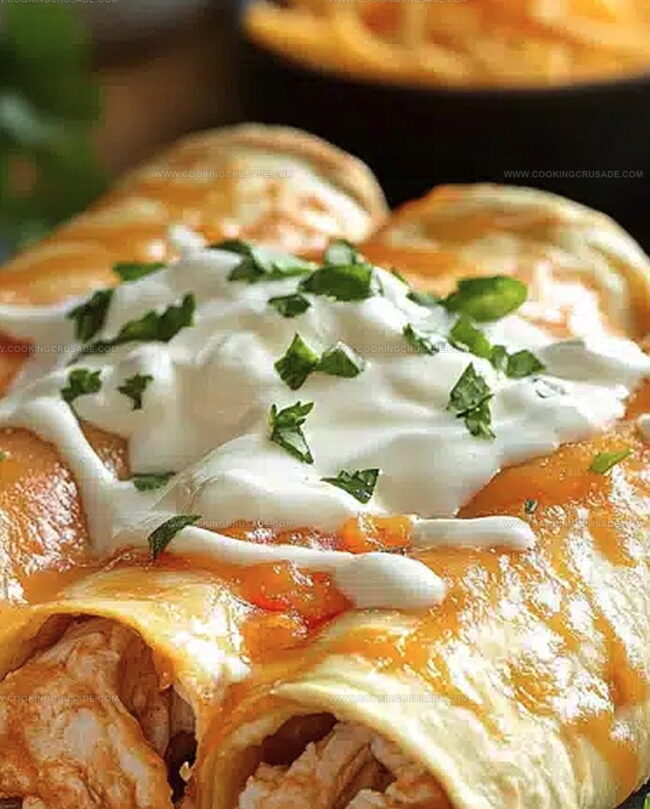
Crispy Golden Baked Chicken Chimichangas Recipe for Dinner
Crispy, golden chimichangas packed with spicy chicken and melted cheese call to hungry dinner crowds.
The chicken chimichangas recipe blends Mexican-inspired flavors with irresistible crunch.
Tortillas wrap around seasoned shredded chicken, creating a delectable handheld meal.
Baked until perfectly golden and crisp, these chimichangas deliver a satisfying bite every single time.
Each piece bursts with zesty spices and tender meat that dance across your palate.
Simple ingredients transform into a crowd-pleasing dish that comes together faster than you might expect.
Serve these mouthwatering chimichangas alongside fresh salsa or creamy guacamole for a complete meal that’ll have everyone asking for seconds.
Quick Recipe Overview
What Goes In Baked Chicken Chimichangas
For Chicken Filling Base:For Protein and Seasoning:For Binding and Texture:For Frying and Finishing:Kitchen Tools For Baked Chicken Chimichangas
Simple Steps For Baked Chicken Chimichangas

Warm up a skillet and dance some olive oil around. Toss in chopped onions and green peppers, letting them soften and whisper their delicious secrets. Sprinkle in minced garlic for an aromatic punch. Blend shredded chicken, green chilies, zesty taco seasoning, and a splash of chicken broth. Let everything mingle and heat through, then fold in melty cheese.
Grab a tortilla and create a canvas. Layer refried beans if you’re feeling adventurous. Plop a generous scoop of your sizzling chicken mixture right in the center. Fold the sides like a cozy blanket, then roll from the bottom up into a neat little package. Each chimichanga should look tight and ready for action.
You’ve got two paths: golden frying or oven baking. For frying, heat oil in a skillet until it’s shimmering. Carefully nestle your chimichangas seam-side down, turning until they’re a gorgeous golden brown. If baking, slide them into a 400F oven, brushed with oil, and bake until they’re crispy and singing.
Crown your chimichangas with dollops of sour cream, salsa’s zesty embrace, creamy guacamole, and a sprinkle of fresh cilantro. Dive in while they’re hot and enjoy the flavor fiesta!
Tips To Perfect Baked Chicken Chimichangas
Serving Ideas For Baked Chicken Chimichangas
How To Store Baked Chicken Chimichangas
Print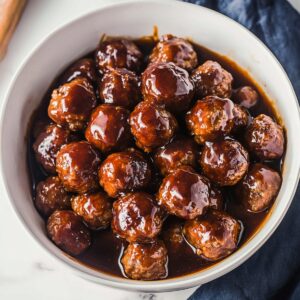
Tender Slow Cooker Honey Garlic Meatballs Recipe
- Total Time: 5 hours 10 minutes
- Yield: 7 1x
Description
Mouthwatering slow cooker honey garlic meatballs combine tender beef with a sweet and tangy sauce. Savory ingredients meld perfectly, creating a simple yet irresistible dish that satisfies hungry guests with minimal preparation effort.
Ingredients
- 1 kg (2 lbs) frozen meatballs (homemade or store-bought)
- ½ cup honey
- ½ cup low-sodium soy sauce
- ¼ cup ketchup
- ¼ cup chicken broth
- 4 cloves garlic, minced
- 1 tbsp rice vinegar (or apple cider vinegar)
- 1 tsp grated fresh ginger (optional)
- 1 tbsp olive oil (if using raw meatballs)
- 1 tbsp cornstarch + 2 tbsps water (for thickening)
- 1 tbsp sesame seeds
- 2 green onions, sliced
Instructions
- Searing Preparation: Heat a skillet with olive oil over medium temperature, browning meatballs until they develop a golden exterior. For frozen meatballs, transfer directly into the slow cooker without searing.
- Sauce Creation: Whisk honey, soy sauce, ketchup, chicken broth, minced garlic, rice vinegar, and grated ginger in a mixing bowl until achieving a glossy, uniform mixture.
- Coating and Flavor Infusion: Gently drench meatballs with the prepared sauce, ensuring comprehensive coverage and even distribution throughout the slow cooker.
- Slow Cooking Process: Cover and cook on low for 4-5 hours or on high for 2-3 hours, allowing meatballs to become tender and absorb the rich sauce completely.
- Sauce Thickening: Prepare a cornstarch slurry by whisking cornstarch and water until smooth, then pour into the slow cooker and increase to high temperature.
- Final Reduction: Simmer for 15-20 minutes, stirring intermittently to prevent burning and achieve a glossy, clingy sauce consistency that perfectly coats the meatballs.
- Garnishing and Serving: Sprinkle toasted sesame seeds and finely sliced green onions over the meatballs, then serve immediately atop fluffy white rice or tender noodles.
Notes
- Perfectly Brown Meatballs: Sear meatballs in a hot skillet with olive oil to develop a rich golden crust, which locks in flavor and creates a delicious caramelized exterior before slow cooking.
- Sauce Consistency Hack: Whisk cornstarch slurry thoroughly to eliminate lumps, ensuring a smooth, glossy sauce that coats meatballs evenly without becoming gloopy or thin.
- Flavor Infusion Technique: Let meatballs simmer slowly in sauce for the full recommended time, allowing herbs and spices to deeply penetrate and tenderize the meat for maximum taste absorption.
- Low-Carb Adaptation: Replace traditional rice with cauliflower rice or zucchini noodles to transform this dish into a keto-friendly meal without sacrificing the rich, savory flavor profile.
- Prep Time: 10 minutes
- Cook Time: 4-5 hours (low) or 2-3 hours (high)
- Category: Dinner, Appetizer, Snacks
- Method: Slow Cooking
- Cuisine: American
Nutrition
- Serving Size: 7
- Calories: 295
- Sugar: 22 g
- Sodium: 580 mg
- Fat: 7 g
- Saturated Fat: 1 g
- Unsaturated Fat: 6 g
- Trans Fat: 0 g
- Carbohydrates: 42 g
- Fiber: 0 g
- Protein: 11 g
- Cholesterol: 30 mg
Olivia Bennett
Co-Founder & Content Creator
Expertise
Nutritional Analysis, Dietary Accommodations, Food Writing and Blogging,
Education
University of Texas at Austin
Institute of Culinary Education, New York, NY
Olivia Bennett is Cooking Crusade’s go-to expert for nutritious, feel-good food. Based in Austin, she blends her degree in Nutrition from the University of Texas with plant-based culinary training from the Institute of Culinary Education.
Olivia’s recipes are all about balance: vibrant, wholesome, and easy-to-love dishes that work for all kinds of eaters. Her mission is simple: to make healthy eating approachable and genuinely tasty, with tips that support your lifestyle, not complicate it.