
Homemade DQ Magic: Irresistible Ice Cream Cake Recipe
Celebrating birthdays and special moments calls for a decadent dairy queen ice cream cake recipe that melts hearts and delights taste buds.
Creamy layers of frozen goodness promise pure indulgence without complex baking skills.
Soft, luxurious textures blend seamlessly between ice cream and cake, creating a dessert that feels like pure magic.
No professional pastry experience needed for this crowd-pleasing treat.
Home bakers can easily recreate the classic restaurant-style confection with just a few simple ingredients.
Every slice promises a delightful combination of cool, sweet flavors that will have everyone asking for seconds.
This recipe transforms an ordinary gathering into an extraordinary celebration of deliciousness.
Quick Recipe Overview
All You Need For Copycat Dairy Queen Ice Cream Cake Recipe
For Base Layer:For Crunch Layer:For Frosting and Decoration:Freezer Tools For Copycat Dairy Queen Ice Cream Cake Recipe
How To Layer Copycat Dairy Queen Ice Cream Cake Recipe
Line a cake pan with plastic wrap, ensuring it overhangs the edges for easy cake removal. This trick makes lifting your dessert a breeze.
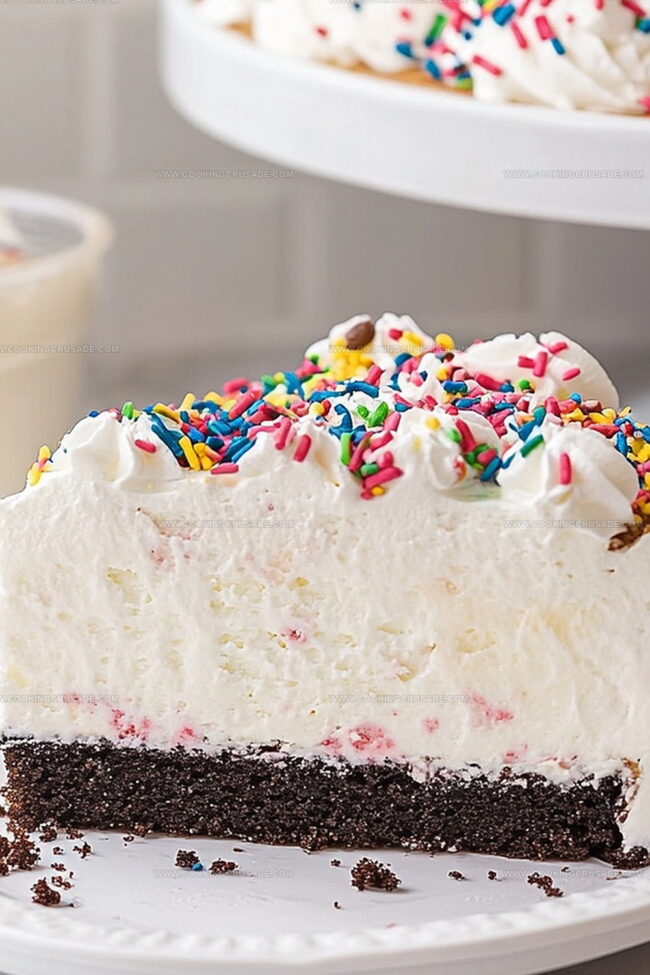
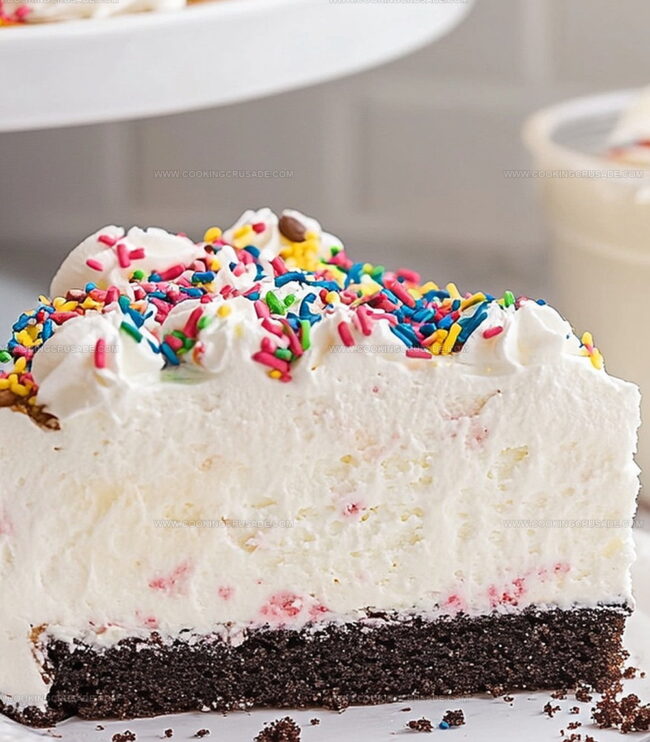
Crush cookies and mix with fudge sauce to create a delectable, textured foundation that’ll make taste buds dance with excitement.
Start by spreading chocolate ice cream as the first layer, freezing until solid. Next, add the cookie-fudge crunch layer, then top with vanilla ice cream. Freeze the entire creation for several hours until completely firm.
Blend heavy cream, powdered sugar, and vanilla until peaks form. Generously coat the frozen cake with this dreamy, cloud-like topping.
Enhance your masterpiece with fudge drizzles, playful sprinkles, chocolate shavings, or bright cherries for a stunning presentation.
Remove the cake from the freezer 10-15 minutes before serving to soften slightly. Slice and watch everyone’s eyes light up with pure dessert delight.
Fun Variations For Copycat Dairy Queen Ice Cream Cake Recipe
Tips For Serving Copycat Dairy Queen Ice Cream Cake Recipe
Storage Tips For Copycat Dairy Queen Ice Cream Cake Recipe
Print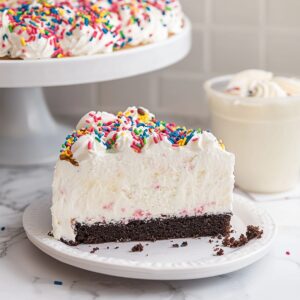
Effortless Dairy Queen Ice Cream Cake Recipe
- Total Time: 6 hours 30 minutes
- Yield: 13 1x
Description
Copycat dairy queen ice cream cake blends creamy layers of vanilla and chocolate goodness with rich frosting. Cool dessert magic combines store-bought ingredients for a simple, delightful treat you can quickly enjoy at home.
Ingredients
- 1.5 quarts (1.4 liters) vanilla ice cream (softened)
- 1.5 quarts (1.4 liters) chocolate ice cream (softened)
- 24 Oreo cookies, crushed
- ½ cup (120 milliliters) hot fudge sauce (store-bought or homemade)
- 2 cups (480 milliliters) heavy whipping cream
- ¼ cup (60 grams) powdered sugar
- 1 tsp (5 milliliters) vanilla extract
- Sprinkles
- Chocolate shavings
- Extra fudge sauce
- Maraschino cherries
Instructions
- Mold Preparation: Line a springform or deep cake pan with parchment paper, ensuring complete coverage for seamless cake extraction.
- Crunch Layer Creation: Blend crushed Oreo cookies with hot fudge sauce until uniformly combined, setting mixture aside for later layering.
- Base Construction: Spread softened chocolate ice cream evenly across the pan’s bottom, then freeze for 30 minutes to solidify the initial layer.
- Layering Process: Apply the Oreo-fudge crunch mixture over the chocolate ice cream, creating an even distribution. Return to freezer for 15 minutes to set the crunch layer.
- Ice Cream Assembly: Cover the crunch layer with softened vanilla ice cream, smoothing the surface for a uniform appearance. Freeze the entire cake for 4-6 hours until completely solid.
- Frosting and Decoration: Whip heavy cream, powdered sugar, and vanilla extract in a chilled bowl until stiff peaks form. Generously coat the frozen cake’s exterior with the delicate whipped cream.
- Final Touches: Embellish the cake with additional fudge sauce drizzle, sprinkles, chocolate shavings, or cherries to enhance visual appeal.
- Serving Preparation: Refrigerate the decorated cake for 2 hours or overnight. Before serving, let the cake rest at room temperature for 10-15 minutes to facilitate easier slicing and softer texture.
Notes
- Prevent Ice Cream Melting: Work quickly when layering ice cream to maintain its consistency. Use pre-chilled utensils and work in a cool kitchen environment to prevent rapid melting.
- Smooth Layer Technique: Use an offset spatula or the back of a spoon to create even, smooth ice cream layers. Gently press and spread to eliminate air pockets and achieve a professional finish.
- Crunch Layer Binding: Ensure the Oreo-fudge mixture is not too wet or dry. The consistency should be slightly sticky to help it adhere to the ice cream layer without becoming soggy.
- Make-Ahead Friendly: Prepare the cake up to 3-4 days in advance. Wrap tightly in plastic wrap and store in the freezer to maintain its texture and flavor. Cover with an additional layer of aluminum foil to prevent freezer burn.
- Prep Time: 30 minutes
- Cook Time: 6 hours
- Category: Desserts, Snacks
- Method: Mixing
- Cuisine: American
Nutrition
- Serving Size: 13
- Calories: 400
- Sugar: 30 g
- Sodium: 150 mg
- Fat: 24 g
- Saturated Fat: 14 g
- Unsaturated Fat: 8 g
- Trans Fat: 0 g
- Carbohydrates: 40 g
- Fiber: 1 g
- Protein: 5 g
- Cholesterol: 80 mg
Olivia Bennett
Co-Founder & Content Creator
Expertise
Nutritional Analysis, Dietary Accommodations, Food Writing and Blogging,
Education
University of Texas at Austin
Institute of Culinary Education, New York, NY
Olivia Bennett is Cooking Crusade’s go-to expert for nutritious, feel-good food. Based in Austin, she blends her degree in Nutrition from the University of Texas with plant-based culinary training from the Institute of Culinary Education.
Olivia’s recipes are all about balance: vibrant, wholesome, and easy-to-love dishes that work for all kinds of eaters. Her mission is simple: to make healthy eating approachable and genuinely tasty, with tips that support your lifestyle, not complicate it.