
The Sweet Joy of Filipino Sticky Rice Cake Recipe: Easy & Homey
A delectable Filipino sticky rice cake that whispers stories of tradition and comfort.
Sweet memories dance through every sticky, golden-brown bite.
The rich aroma filling your kitchen with warmth and nostalgia.
Generations have cherished this beloved dessert, passing down secrets from one cook to another.
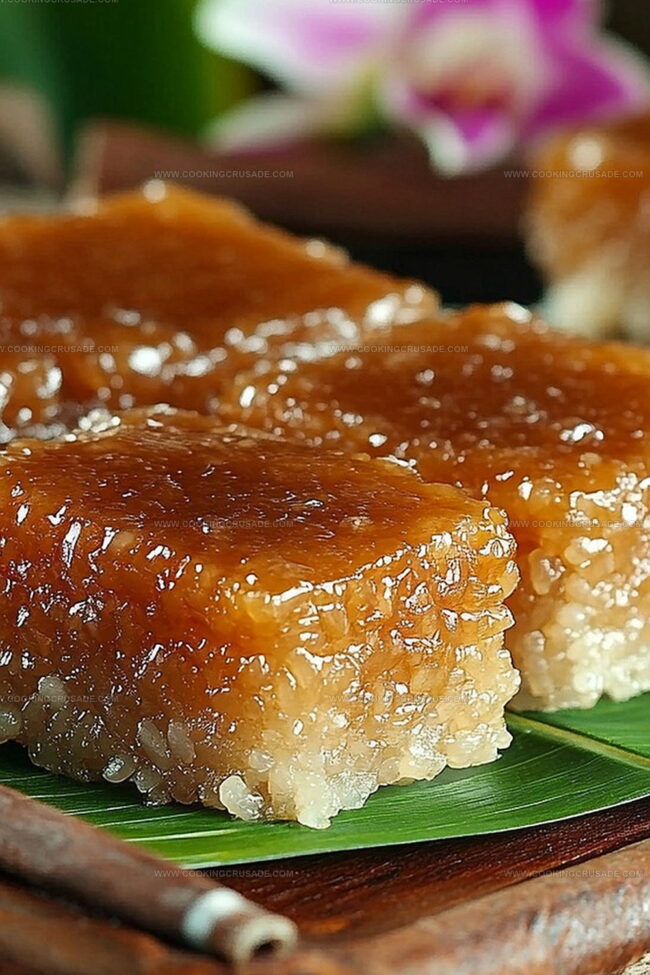
Coconut and caramelized sugar intertwine, creating a symphony of flavors that speaks directly to your soul.
Ancient culinary techniques blend seamlessly with modern ingredients in this irresistible treat.
You’ll fall in love with every single morsel of this magical dessert that connects past and present.
Grab a plate and let the deliciousness begin!
Why Filipino Sticky Rice Cake Is A Sweet Classic
What You’ll Need For Filipino Sticky Rice Cake
Main Ingredients:
Sticky Rice:Sweeteners and Flavor Enhancers:Finishing Elements:Supporting Ingredients:How To Make Filipino Sticky Rice Cake

Step 1: Prepare Sticky Rice Blend
Grab your glutinous rice and give it a thorough rinse under cool water until the water becomes crystal clear. Drain the rice completely. In a large cooking pot, combine the following ingredients:Stir everything together and cook over medium heat. Keep stirring frequently to prevent sticking. Continue cooking until the liquid disappears and the rice becomes perfectly tender, which takes about 15-20 minutes. Set the cooked rice mixture aside.
Step 2: Create Luscious Coconut Topping
In a separate saucepan, begin crafting the delectable coconut glaze. Mix together:Cook the mixture over medium heat, stirring continuously. Watch as it transforms into a rich, caramel-like sauce. This process takes around 8-10 minutes. Once the consistency is perfect, add a splash of vanilla extract for extra depth of flavor.
Step 3: Assemble Delightful Rice Cake
Prepare your baking dish by greasing it thoroughly. For an authentic touch, line the dish with banana leaves if available. Gently press the cooked sticky rice into the dish, smoothing the surface with a spatula. Pour the luxurious coconut glaze over the rice, ensuring complete and even coverage.
Step 4: Enhance With Baking
Warm your oven to 375°F (190°C). Slide the rice cake into the oven and bake for 10-15 minutes. Look for bubbling edges and a slightly caramelized top that promises delicious crispy notes.
Step 5: Cool And Slice
Allow the rice cake to cool completely. Once cooled, slice into beautiful squares or rectangular pieces. Serve at room temperature or warm for a comforting treat that celebrates Filipino culinary traditions.
Helpful Tips For Filipino Sticky Rice Cake
How To Store Filipino Sticky Rice Cake Without Drying Out
Tasty Pairings For Filipino Sticky Rice Cake
Try These Versions Of Filipino Sticky Rice Cake
FAQs For Filipino Sticky Rice Cake
This unique dessert combines glutinous rice with rich coconut flavors, creating a traditional Filipino delicacy that’s both sweet and creamy, unlike typical Western-style cakes.
No, glutinous rice is a special type of sticky rice with a higher starch content that becomes very chewy and cohesive when cooked, perfect for creating dense, sweet desserts like this rice cake.
Absolutely! You can prepare the rice cake on the stovetop by cooking the rice and glaze, then simply letting it set at room temperature instead of baking, which still produces a delicious result.
The coconut glaze adds a rich, caramel-like sweetness that seeps into the rice, creating layers of flavor and a beautiful glossy finish that makes the dessert both visually appealing and incredibly tasty.
Print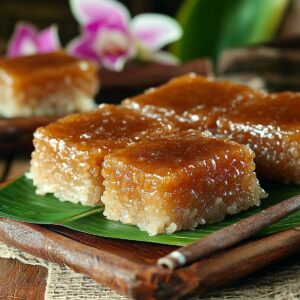
Filipino Sticky Rice Cake Recipe
- Total Time: 50 minutes
- Yield: 8 1x
Description
Sweet and sticky bibingka delights palates with its rich coconut essence, blending traditional Filipino bakery magic. Warm, golden slices invite you to savor a delectable slice of cultural culinary heritage.
Ingredients
Main Ingredients:
- 2 cups glutinous rice
- 2 ½ cups water
- 1 cup coconut milk
- 1 cup coconut cream
Sweeteners:
- ¾ cup brown sugar (for sticky rice layer)
- ¾ cup brown sugar (for coconut glaze)
Flavor Enhancers:
- ½ teaspoon salt
- ½ teaspoon vanilla extract (optional)
Instructions
- Prepare the glutinous rice by rinsing thoroughly under cold water until the liquid becomes transparent. Drain excess moisture completely.
- Transfer the cleansed rice into a large cooking vessel, combining it with coconut milk, water, brown sugar, and a pinch of salt. Gently stir the mixture to ensure even distribution of ingredients.
- Simmer the rice mixture over moderate heat, stirring periodically to prevent sticking and ensure uniform cooking. Continue cooking until the liquid is fully absorbed and the rice reaches a tender, sticky consistency.
- While the rice cooks, create the luxurious coconut glaze in a separate saucepan. Blend coconut cream with brown sugar, heating and stirring continuously to develop a rich, caramel-like texture.
- Once the glaze reaches a thick, glossy state, incorporate vanilla extract for an aromatic enhancement. Remove from heat and let it rest momentarily.
- Prepare a baking dish by either greasing its surface or lining it with traditional banana leaves for an authentic touch. This will prevent the rice cake from adhering to the container.
- Carefully transfer the cooked sticky rice into the prepared dish, using a spatula to spread and compress the mixture evenly across the surface.
- Generously pour the prepared coconut glaze over the rice, ensuring complete and uniform coverage.
- Optional baking step: Preheat the oven and place the rice cake inside, allowing the glaze to caramelize and develop a slightly crisp exterior.
- Allow the rice cake to cool completely, which helps it set and makes cutting easier. Slice into elegant squares or rectangular portions.
- Serve the Filipino sticky rice cake at room temperature or gently warmed, showcasing its delightful texture and rich flavors.
Notes
- Choose glutinous rice specifically for achieving the signature sticky and chewy texture essential to this traditional Filipino dessert.
- Rinse rice thoroughly to remove excess starch, ensuring a cleaner and more distinct grain structure during cooking.
- Experiment with coconut cream variations by using different brands or homemade versions to customize the richness and depth of flavor.
- Adapt the recipe for gluten-free diets by confirming all ingredients are certified gluten-free, especially if using store-bought coconut products.
- Create a vegan-friendly version by using alternative sweeteners like coconut sugar or maple syrup instead of traditional brown sugar.
- Enhance moisture retention by covering the baking dish with aluminum foil during the initial baking stage to prevent excessive drying.
- Elevate presentation by garnishing with toasted coconut flakes, sliced almonds, or a light dusting of cinnamon before serving.
- Store leftovers in an airtight container at room temperature for up to two days, or refrigerate for extended freshness without compromising texture.
- Prep Time: 10 minutes
- Cook Time: 40 minutes
- Category: Desserts, Snacks
- Method: Baking
- Cuisine: Filipino
Nutrition
- Serving Size: 8
- Calories: 200
- Sugar: 10 g
- Sodium: 150 mg
- Fat: 8 g
- Saturated Fat: 7 g
- Unsaturated Fat: 1 g
- Trans Fat: 0 g
- Carbohydrates: 30 g
- Fiber: 1 g
- Protein: 3 g
- Cholesterol: 0 mg
James Mitchell
Founder & Recipe Developer
Expertise
Recipe Creation and Testing, Fusion Cuisine, Food Styling and Photography, Culinary Education
Education
Kendall College, Chicago, IL
The Culinary Institute of America, Hyde Park, NY
James Mitchell is the founder and fearless flavor explorer at Cooking Crusade. With a degree in Culinary Arts from Kendall College and advanced training in global gastronomy from The Culinary Institute of America, James has spent over a decade perfecting the art of recipe creation.
His background includes fine dining, private cheffing, and food styling, but his true joy comes from turning big ideas into doable recipes for home cooks. Every dish he shares is a mix of creativity, culture, and a little kitchen magic, built to bring excitement back to everyday meals.