
Zesty Roast Beef & Cheddar Sliders Recipe for Game Day Fun
Sliders pack a punch of flavor that never disappoints when you’re craving something deliciously satisfying.
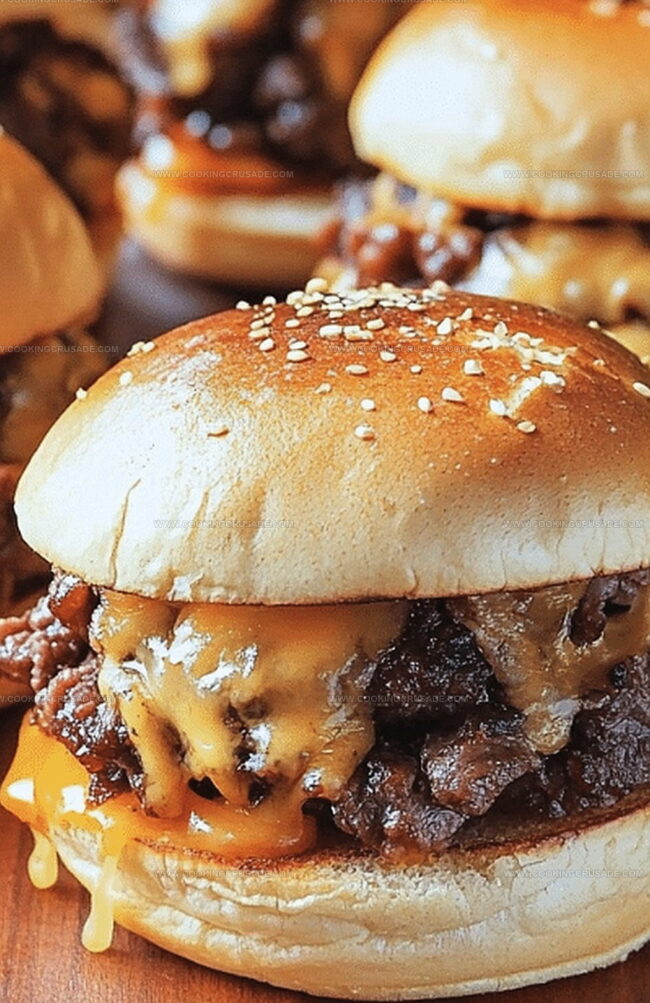
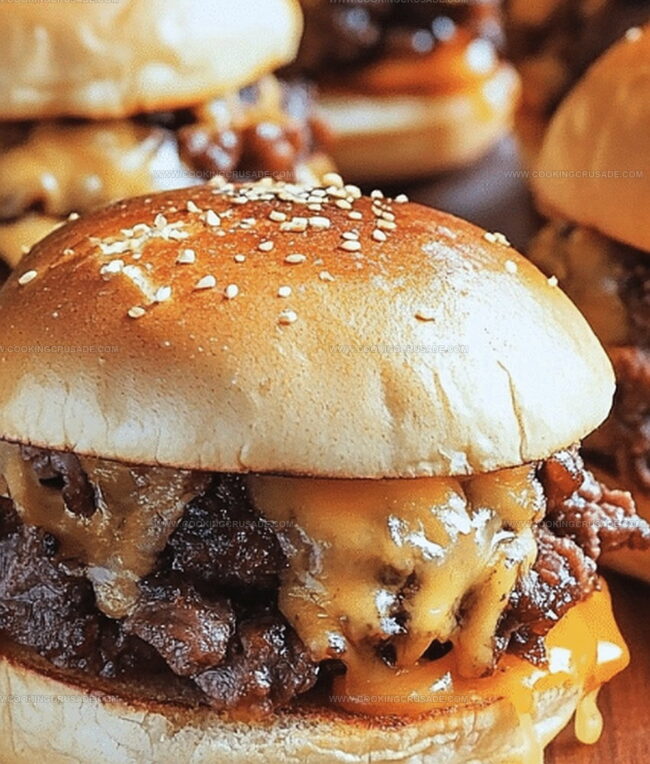
These hearty roast beef and cheddar sliders bring comfort straight to your plate with minimal effort.
Tender, juicy roast beef nestles between soft dinner rolls, complemented by sharp cheddar cheese that melts into pure deliciousness.
Each bite delivers a perfect balance of savory meat and rich cheese that makes these mini sandwiches irresistible.
Layered with simple ingredients and quick to assemble, these sliders work beautifully for game day, casual gatherings, or a quick weeknight meal.
Packed with robust flavors and easy to customize, you’ll find yourself returning to this recipe time and again.
Prepare to elevate your sandwich game with these mouthwatering little bites that are sure to become a crowd favorite.
Quick Recipe Overview
Roast Beef & Cheddar Sliders Ingredient List
For Base Layer:For Protein and Cheese:For Flavor Enhancers:Tools To Make Roast Beef & Cheddar Sliders Easy
How To Layer Roast Beef & Cheddar Sliders Just Right
Crank your oven to a cozy 350°F and grab a baking dish. Give it a quick spray or line with parchment paper for easy cleanup.
Slice those soft Hawaiian rolls in half, keeping them connected like a delicious sandwich family. Gently nestle the bottom half into your prepared dish.
Spread a whisper-thin layer of creamy mayo across the roll bottoms. This will help lock in moisture and add a tangy kick.
Drape succulent roast beef slices evenly across the rolls. Crown them with sharp cheddar cheese that’ll melt into pure deliciousness.
Dollop some zesty horseradish sauce on the roll tops for an extra punch of flavor. Press the top half down gently to create a perfect slider stack.
Slide the dish into the preheated oven. Bake until the cheese melts and the edges turn golden brown, about 15-20 minutes. Let cool for a few minutes, then slice and serve these irresistible little flavor bombs.
Tips For Toasty Roast Beef & Cheddar Sliders
Serve Roast Beef & Cheddar Sliders Crowd-Style
How To Store Roast Beef & Cheddar Sliders Warm
Print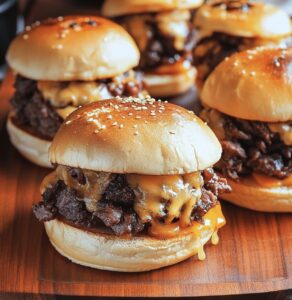
Hearty Roast Beef & Cheddar Sliders Recipe
- Total Time: 30 minutes
- Yield: 13 1x
Description
Classic roast beef & cheddar sliders showcase tender meat and melted cheese nestled between mini Hawaiian rolls. Hearty sandwiches blend savory beef with sharp cheddar for an irresistible party snack you’ll crave at gatherings.
Ingredients
- 1 lb deli-style roast beef, thinly sliced
- 12 Hawaiian rolls (or slider buns)
- 8 slices cheddar cheese
- 4 tbsps unsalted butter, melted
- ½ cup mayonnaise
- ¼ cup prepared horseradish sauce
- 1 tsp Worcestershire sauce
- 1 tsp Dijon mustard
- 1 tsp sesame seeds
- ½ tsp garlic powder
- ½ tsp onion powder
- ½ tsp dried parsley (or fresh)
Instructions
- Preparation: Preheat the oven to 350F (175C), positioning the rack centrally. Prepare a 9×13-inch baking dish with a light oil coating or parchment paper lining.
- Roll Assembly: Slice Hawaiian rolls horizontally, keeping them connected. Layer the bottom half in the prepared baking dish, spreading a thin mayonnaise base across the surface.
- Protein and Cheese Layer: Uniformly cover the rolls with roast beef slices, then overlay with cheddar cheese, allowing slight overlap for maximum coverage.
- Flavor Enhancement: Distribute horseradish sauce across the interior of the roll tops, adding a zesty dimension to the meat and cheese foundation.
- Baking Technique: Cap the sliders with roll tops, pressing gently. Encase the entire dish in aluminum foil, creating a protective seal to prevent excessive browning.
- Cooking Process: Bake for 15-20 minutes until cheese melts and rolls warm through. Remove foil during the final 3-5 minutes to achieve a golden, crisp exterior.
- Serving: Rest the sliders for 2-3 minutes after removing from the oven, then slice and serve while warm for optimal flavor and texture.
Notes
- Select Meat Quality: Choose medium-rare roast beef from deli counter for maximum tenderness and flavor, avoiding pre-packaged options which can taste bland.
- Cheese Melting Technique: Let cheese reach room temperature before layering to ensure smooth, even melting without creating greasy patches on slider surface.
- Moisture Management: Use light mayonnaise spread to prevent soggy rolls while maintaining delicate texture and preventing bread from becoming dry during baking.
- Spice Customization: Adjust horseradish sauce intensity based on personal preference – start with conservative amount and gradually increase for balanced heat without overwhelming other ingredients.
- Prep Time: 10 minutes
- Cook Time: 20 minutes
- Category: Lunch, Appetizer, Snacks
- Method: Baking
- Cuisine: American
Nutrition
- Serving Size: 13
- Calories: 290
- Sugar: 2 g
- Sodium: 720 mg
- Fat: 15 g
- Saturated Fat: 7 g
- Unsaturated Fat: 6 g
- Trans Fat: 0 g
- Carbohydrates: 27 g
- Fiber: 1 g
- Protein: 14 g
- Cholesterol: 45 mg
Olivia Bennett
Co-Founder & Content Creator
Expertise
Nutritional Analysis, Dietary Accommodations, Food Writing and Blogging,
Education
University of Texas at Austin
Institute of Culinary Education, New York, NY
Olivia Bennett is Cooking Crusade’s go-to expert for nutritious, feel-good food. Based in Austin, she blends her degree in Nutrition from the University of Texas with plant-based culinary training from the Institute of Culinary Education.
Olivia’s recipes are all about balance: vibrant, wholesome, and easy-to-love dishes that work for all kinds of eaters. Her mission is simple: to make healthy eating approachable and genuinely tasty, with tips that support your lifestyle, not complicate it.