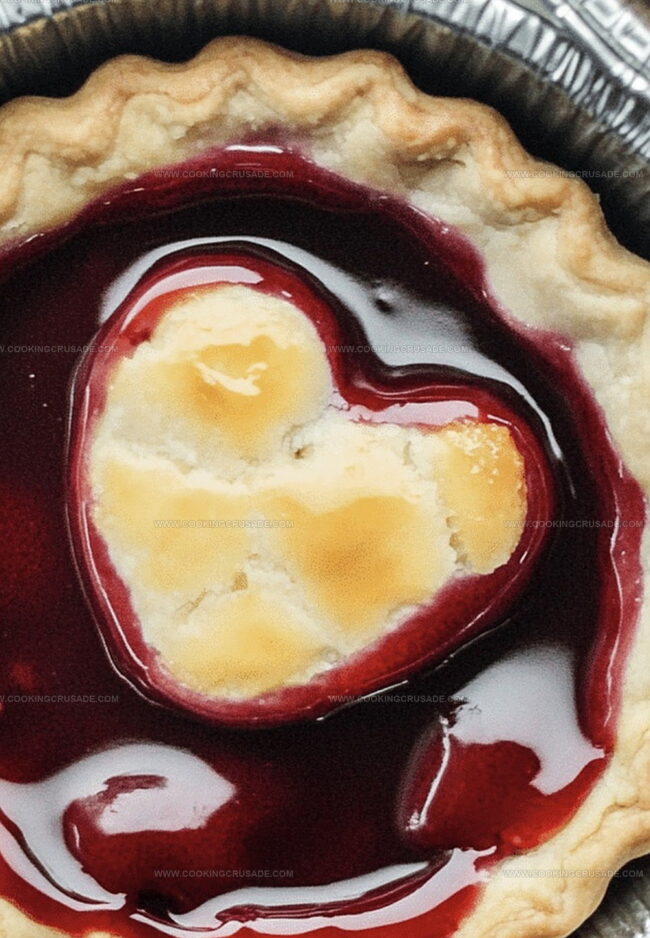
Sweet, bite-sized cherry pie treats bring pure joy to any dessert table.
These delightful mini cherry pie delicacies pack incredible flavor into one perfect handful.
Bursting with rich, ruby-red fruit and a flaky golden crust, they tempt even the most discerning sweet tooth.
Each mini pie delivers a classic dessert experience in a compact, adorable package.
Fresh cherries nestled in buttery pastry create a mouthwatering combination that sparks instant smiles.
Surprisingly simple to prepare, these miniature pies promise to become your new favorite crowd-pleasing dessert.
Serve them warm with a scoop of vanilla ice cream for a truly irresistible ending to any meal.
Quick Recipe Overview
Prep Time: 25 minutes
Cook Time: 40 minutes
Total Time: 1 hour 5 minutes
Calories: 246 kcal
Servings: 9
Ingredients You Need For Mini Cherry Pie
For Crust Base:
All-Purpose Flour: Provides the structural foundation for the flaky pastry, selecting unbleached flour gives a more natural texture and subtle wheat flavor.
Salt: Enhances the overall flavor profile and helps strengthen the gluten network in the dough.
For Fat Component:
Unsalted Butter: Creates tender, rich layers in the pie crust, choose high-quality butter with a higher fat content for maximum flakiness.
For Liquid Binding:
Ice Water: Helps bind the ingredients without developing excess gluten, ensuring a delicate and crisp pastry texture.
Baking Tools For Mini Cherry Pie
Large bowl: Essential for mixing dry ingredients and creating pie dough.
Pastry cutter: Perfect for cutting cold butter into flour, creating flaky texture.
Fingers: Backup method for blending butter and flour if pastry cutter isn’t available.
Plastic wrap: Crucial for wrapping and chilling pie dough.
Measuring tablespoon: Helps add precise amount of ice water.
Whisk: Useful for combining flour and salt evenly.
How To Make Mini Cherry Pie From Scratch
Craft the Pie Crust Create a powdery base by combining flour and salt in a spacious mixing bowl. Work cold butter into the mixture using your fingertips or a handy pastry cutter until it looks like rough, crumbly sand.
Bind the Dough Drizzle in chilly water drop by drop, gently stirring until the mixture transforms into a cohesive dough. Shape the mixture into a smooth disk, wrap it lovingly in plastic, and let it chill in the refrigerator for a relaxing 30-minute rest.
Prepare the Filling Scoop your favorite cherry mixture onto a delicate pie crust, spreading it with care and love. Ensure the filling is evenly distributed, creating a mouthwatering canvas for your mini masterpiece.
Assemble and Bake Top the filled crust with a matching pastry layer, crimping the edges to seal in all the delicious goodness. Cut a few playful vents to let steam escape, then slide your creation into a preheated oven. Bake until the crust turns a gorgeous golden brown and the filling bubbles with excitement.
Cool and Serve Allow your mini cherry pie to rest and cool slightly, letting the flavors meld and intensify. Slice carefully and serve, watching eyes light up with pure dessert delight.
Tips For Mini Cherry Pie Perfection
Butter Blending Brilliance: Work quickly when incorporating butter to keep it cold, ensuring a flaky, tender crust that melts in your mouth.
Make-Ahead Magic: Prepare the pie dough up to 2 days in advance and store in the refrigerator, saving precious time on baking day.
Gluten-Free Twist: Swap traditional flour with a gluten-free all-purpose blend for those with wheat sensitivities, maintaining the same delicious texture.
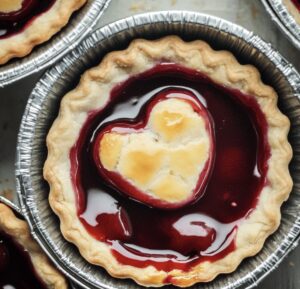
Mini Pie Pan Perfection: Use a muffin tin for consistent sizing and easy removal, creating adorable individual servings that are perfect for parties or portion control.
Flavor Adventure: Experiment with different fruit fillings like blueberry, raspberry, or mixed berries to keep the recipe exciting and match seasonal availability.
Serving Mini Cherry Pie The Sweet Way
Cherry Pie Paradise: Showcase these adorable mini pies on a rustic wooden board with fresh cherries scattered around for a charming, homemade touch.
Delightful Dessert Companion: Serve alongside a scoop of vanilla bean ice cream or a dollop of fresh whipped cream to complement the pie’s sweet, tangy flavor.
Brunch Elegance: Present these mini pies as a stunning finale to a weekend brunch, paired with a light dusting of powdered sugar and a side of fresh mint leaves.
Picnic Perfect Treat: Pack these individual pies in cute mason jars or small containers for a portable dessert that’s ideal for outdoor gatherings and summer picnics.
Store Mini Cherry Pie The Easy Way
Chilling Strategy: Refrigerate the pie dough for up to 48 hours before baking to enhance flavor development and make rolling easier.
Freezer Friendly: Wrap unbaked mini cherry pies individually in plastic wrap, then store in a freezer bag for up to 3 months. Bake directly from frozen, adding 5-10 extra minutes to cooking time.
Refrigeration Tip: Cooked mini cherry pies stay fresh in an airtight container for 3-4 days. Keep at room temperature for optimal texture or refrigerate to extend shelf life.
Make-Ahead Magic: Prepare pie dough and filling separately up to 2 days in advance. Store dough wrapped tightly in the refrigerator and filling in a sealed container to streamline your baking process.
Delightful mini cherry pie spotlights sweet summer cherries nestled in buttery, flaky pastry. Homemade dessert perfection delivers pure satisfaction with minimal kitchen effort.
Ingredients
Scale
2 cups (300g) cherries, pitted
¼ cup (50g) sugar, granulated
1 tbsp cornstarch
1 ¼ cups (155g) flour, all-purpose
½ cup (115g) butter, unsalted, cold and diced
½ tsp salt
3–4 tbsps water, ice
½ tsp extract, vanilla
¼ tsp extract, almond
1 egg, beaten
sugar, coarse
Instructions
Dough Preparation: Blend flour and salt in a large mixing bowl, establishing the base for a delicate pastry crust with a light, even touch.
Butter Integration: Delicately work chilled butter into the dry ingredients using fingertips or a pastry blender, transforming the mixture into a sandy, crumbly consistency that promises ultimate flakiness.
Moisture Addition: Gradually introduce ice-cold water, gently folding and pressing the ingredients until a unified dough forms, taking care to minimize handling and preserve the pastry’s tender structure.
Dough Conditioning: Sculpt the pastry into a compact, smooth-edged disk with uniform thickness, then envelop completely in plastic wrap to protect against moisture evaporation.
Chilling Phase: Refrigerate the wrapped dough for optimal gluten relaxation and butter solidification, ensuring a supremely tender and exceptionally flaky crust that will elevate any culinary creation.
Notes
Maintain Butter Coldness: Keep butter extremely cold and work quickly to prevent melting, which ensures a flaky, tender pie crust texture.
Handle Dough Gently: Minimize handling of the pastry dough to prevent developing tough gluten, resulting in a lighter, more delicate crust.
Chill for Perfection: Refrigerate dough for at least 30 minutes before rolling to allow butter to solidify and gluten to relax, creating a more manageable and flakier crust.
Adjust Moisture Carefully: Add ice water gradually and only until the dough just comes together, preventing a sticky or tough pastry.
Nutritional Analysis, Dietary Accommodations, Food Writing and Blogging,
Education
University of Texas at Austin
Degree: Bachelor of Science in Nutrition
Focus: Emphasis on dietary planning, food science, and the relationship between nutrition and health.
Institute of Culinary Education, New York, NY
Program: Plant-Based Culinary Arts Certificate
Focus: Specialized training in vegetarian and vegan cooking techniques, emphasizing whole foods and sustainability.
Olivia Bennett is Cooking Crusade’s go-to expert for nutritious, feel-good food. Based in Austin, she blends her degree in Nutrition from the University of Texas with plant-based culinary training from the Institute of Culinary Education.
Olivia’s recipes are all about balance: vibrant, wholesome, and easy-to-love dishes that work for all kinds of eaters. Her mission is simple: to make healthy eating approachable and genuinely tasty, with tips that support your lifestyle, not complicate it.

Olivia Bennett
Co-Founder & Content Creator
Expertise
Nutritional Analysis, Dietary Accommodations, Food Writing and Blogging,
Education
University of Texas at Austin
Institute of Culinary Education, New York, NY
Olivia Bennett is Cooking Crusade’s go-to expert for nutritious, feel-good food. Based in Austin, she blends her degree in Nutrition from the University of Texas with plant-based culinary training from the Institute of Culinary Education.
Olivia’s recipes are all about balance: vibrant, wholesome, and easy-to-love dishes that work for all kinds of eaters. Her mission is simple: to make healthy eating approachable and genuinely tasty, with tips that support your lifestyle, not complicate it.