
Easy Lunchbox Cake Recipe: Sweet Treats to Brighten Your Day
Tucking a delightful lunchbox cake into your midday meal brings unexpected joy to routine afternoons.
Small yet mighty, this compact treat promises big flavor in every bite.
Childhood memories might dance across your palate with each sweet forkful.
Quick preparation means minimal kitchen time and maximum deliciousness.
Portable desserts like these create moments of pure happiness during hectic workdays.
Compact size doesn’t compromise on taste or texture, making this cake a perfect companion for any lunch break.
Craving a little midday magic?
This recipe will become your new secret weapon.
Why Lunchbox Cake Brings Joy In Every Slice
Everything You Need For Lunchbox Cake
Cake Base Ingredients:Leavening and Seasoning:Liquid Ingredients:Buttercream Frosting Ingredients:Optional Decorative Ingredients:Step By Step Guide For Lunchbox Cake
Step 1: Prepare Cake Batter
Grab your mixing tools and let’s create a delightful cake that’ll make lunch exciting! Here’s what you’ll do:Preheat your oven to a cozy 350F (175C). Grab a 9×13-inch pan and give it a friendly coating of butter, then line with parchment paper. In one bowl, whisk together flour, baking powder, and salt until they’re best friends. In another bowl, cream butter and sugar until they transform into a fluffy cloud. Crack eggs one by one, mixing thoroughly after each addition. Splash in vanilla for extra magic. Slowly fold in dry ingredients, alternating with milk, creating a smooth batter. Pour into your prepared pan and spread evenly. Send it to the oven for 18-22 minutes until a toothpick comes out clean. Let the cake cool completely – patience is key!
Step 2: Whip Up Creamy Frosting
Time to create the most irresistible buttercream:Grab your mixer and beat butter until silky smooth. Gradually add powdered sugar, mixing on low speed. Pour in cream, vanilla, and salt. Whip until the frosting becomes cloud-like and dreamy. Want some color? Divide the frosting and mix in food coloring.
Step 3: Craft Mini Cake Wonders
Transform your cake into adorable lunch-sized treats:
Grab a round cookie cutter and create cute cake circles. Place one round on a surface, spread a gentle layer of frosting. Stack another round on top and repeat. Apply a thin crumb coat to seal in the goodness. Chill for 15 minutes to set.
Step 4: Final Touches & Packaging
Make these mini cakes Instagram-worthy:
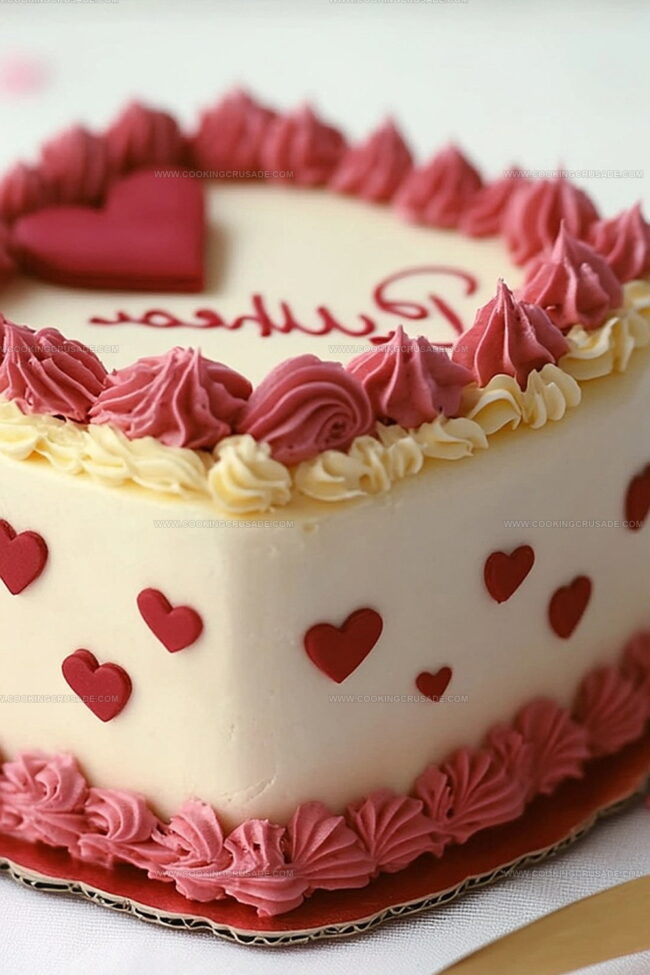
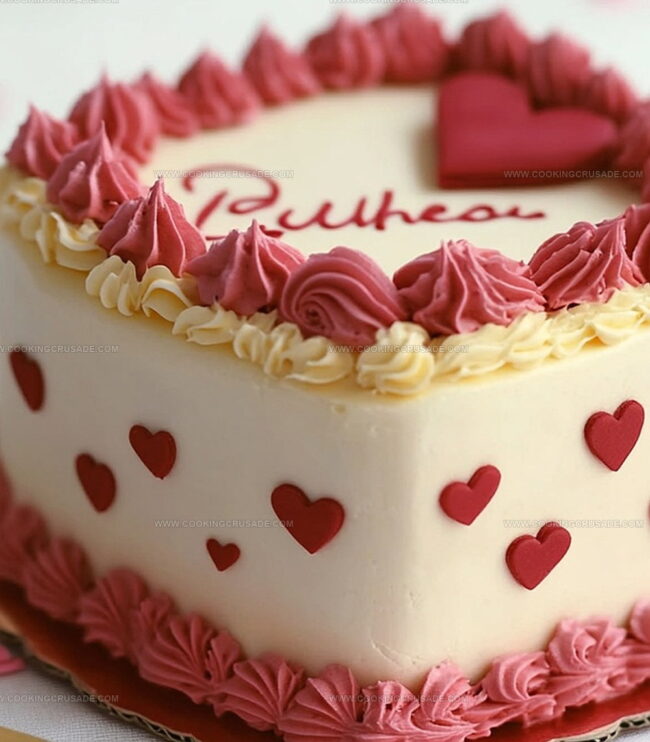
Frost the entire cake smoothly. Get creative with piping designs or sweet messages. Carefully place each mini cake in a cute takeout box lined with a pretty doily or parchment paper. Chill for 30 minutes to firm up the frosting.
Tips To Make Lunchbox Cake Look Cute
Lunchbox Cake Storage Tips That Work
Tasty Pairings For Lunchbox Cake
Fun Variations Of Lunchbox Cake
Lunchbox Cake Questions And Answers
This Lunchbox Cake is unique because it creates adorable mini cakes perfect for packed lunches or individual servings. The recipe allows you to transform a single sheet cake into cute, personalized treats that are easy to transport and share.
Absolutely! You can bake the cake base a day in advance and store it covered at room temperature. The buttercream frosting can also be prepared earlier and refrigerated. Just bring both to room temperature before assembling the mini cakes.
A 3 to 4-inch round cookie cutter is ideal. If you don’t have one, you can use a clean drinking glass or carefully cut the cake into even squares using a sharp knife. The goal is to create uniform mini cake layers.
Make sure your butter is at room temperature before beating. Add powdered sugar gradually and mix on low speed to prevent lumps. If the frosting seems too thick, add a little more cream. If too thin, incorporate more powdered sugar until you reach the perfect consistency.
Print
Lunchbox Cake Recipe
- Total Time: 1 hour 5 minutes
- Yield: 12 1x
Description
Italian-inspired lunchbox cake brings sweet comfort to midday meals with delightful simplicity. Compact layers of rich flavor promise a delectable escape from ordinary snacking, inviting you to savor each carefully crafted bite.
Ingredients
Main Ingredients (Cake Base):
- 1 ¼ cups (160g) all-purpose flour
- ½ cup (113g) unsalted butter, softened
- ¾ cup (150g) granulated sugar
- 2 large eggs, room temperature
- ½ cup (120ml) whole milk, room temperature
Leavening and Seasoning:
- 1 teaspoon baking powder
- ¼ teaspoon salt
- 1 teaspoon vanilla extract
Frosting Ingredients:
- 1 cup (226g) unsalted butter, softened
- 3 cups (360g) powdered sugar
- 2 tablespoons heavy cream or milk
- 1 teaspoon vanilla extract
- 1 pinch of salt
- Gel food coloring (optional)
Instructions
- Prepare the cake base by whisking flour, baking powder, and salt in a separate bowl, ensuring no lumps remain.
- Cream butter and sugar in a large mixing bowl until the mixture becomes pale and airy, which typically takes about 3 minutes of consistent beating.
- Incorporate eggs individually, thoroughly mixing after each addition to create a smooth, homogeneous batter.
- Gently fold in vanilla extract, maintaining the delicate texture of the mixture.
- Alternate adding dry ingredients and milk to the batter, beginning and concluding with the dry mixture. Mix until ingredients are just combined, avoiding overmixing.
- Transfer the batter into a greased and parchment-lined 9×13-inch baking pan, spreading evenly with a spatula to ensure uniform thickness.
- Bake in a preheated oven at 350°F (175°C) for approximately 20 minutes, checking doneness by inserting a toothpick into the center – it should emerge clean.
- Allow the cake to cool completely on a wire rack, which prevents condensation and maintains the cake’s structure.
- Whip butter until smooth and creamy, creating a perfect base for the buttercream frosting.
- Gradually incorporate powdered sugar, mixing on low speed to prevent sugar clouds and ensure a silky consistency.
- Enhance the frosting with heavy cream, vanilla extract, and a pinch of salt, beating until the mixture becomes light and fluffy.
- If desired, divide the frosting and add food coloring for decorative purposes.
- Use a round cookie cutter to delicately extract individual cake layers from the cooled sheet cake.
- Construct mini cakes by layering cake rounds with thin frosting intervals, creating a delicate tower.
- Apply a preliminary crumb coat to seal in loose cake particles, then refrigerate briefly to set.
- Frost the entire mini cake smoothly, creating a polished exterior.
- Embellish with piped buttercream designs or personalized messages.
- Carefully place each mini cake in a parchment-lined takeout box for a charming presentation.
- Refrigerate for 30 minutes to firm up the frosting and maintain structural integrity before serving.
Notes
- Achieve smooth cake texture by ensuring all ingredients are at room temperature before mixing, which helps create a more uniform batter and prevents lumps.
- Prevent dry cake by carefully measuring flour and not overmixing the batter, as excess mixing can develop gluten and lead to a tough, dense result.
- Customize frosting consistency by adjusting heavy cream amount – less cream creates stiffer frosting for detailed piping, while more cream makes it softer and spreadable.
- Create gluten-free version by substituting regular flour with a 1:1 gluten-free baking blend, maintaining the same measurements and mixing technique.
- Prep Time: 30 minutes
- Cook Time: 20 minutes
- Category: Desserts, Snacks
- Method: Baking
- Cuisine: American
Nutrition
- Serving Size: 12
- Calories: 306
- Sugar: 22 g
- Sodium: 135 mg
- Fat: 18 g
- Saturated Fat: 11 g
- Unsaturated Fat: 7 g
- Trans Fat: 0 g
- Carbohydrates: 36 g
- Fiber: 0 g
- Protein: 3 g
- Cholesterol: 62 mg
James Mitchell
Founder & Recipe Developer
Expertise
Recipe Creation and Testing, Fusion Cuisine, Food Styling and Photography, Culinary Education
Education
Kendall College, Chicago, IL
The Culinary Institute of America, Hyde Park, NY
James Mitchell is the founder and fearless flavor explorer at Cooking Crusade. With a degree in Culinary Arts from Kendall College and advanced training in global gastronomy from The Culinary Institute of America, James has spent over a decade perfecting the art of recipe creation.
His background includes fine dining, private cheffing, and food styling, but his true joy comes from turning big ideas into doable recipes for home cooks. Every dish he shares is a mix of creativity, culture, and a little kitchen magic, built to bring excitement back to everyday meals.