
The Ultimate Monster Cookie Peanut Butter Cheesecake Pie Recipe
A monster cookie peanut butter cheesecake pie blends childhood nostalgia with decadent dessert magic.
Sweet memories flood back with each creamy, crunchy bite.
Layers of rich peanut butter goodness melting on your tongue.
Chocolate chips and oats dance through this luscious pie, creating irresistible texture and depth.
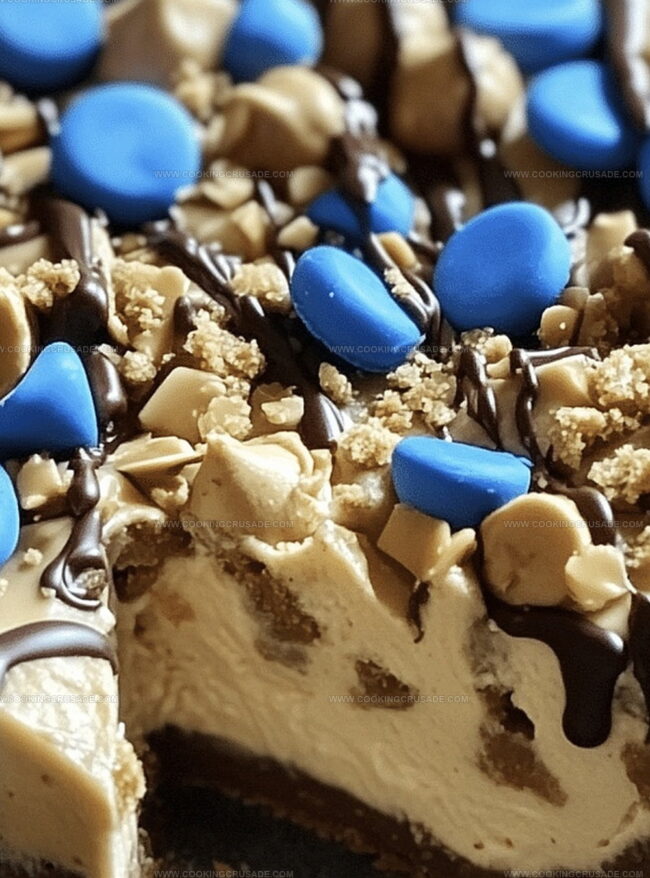
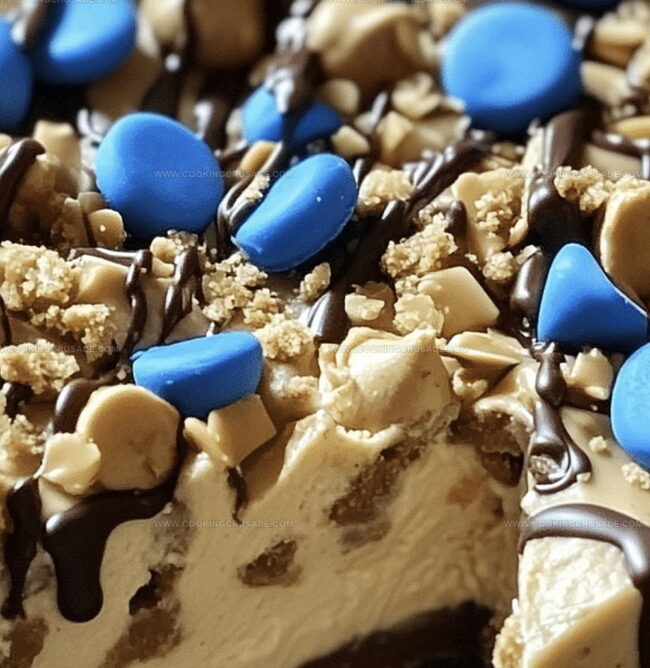
Colorful candy pieces add playful bursts of excitement to every slice.
Classic comfort meets gourmet indulgence in this crowd-pleasing treat.
You won’t be able to resist cutting another generous wedge of this spectacular dessert.
Why Monster Cookie Peanut Butter Cheesecake Pie Is A Showstopper
What Goes Into Monster Cookie Peanut Butter Cheesecake Pie
Crust:Cheesecake Filling:Topping:How To Make Monster Cookie Peanut Butter Cheesecake Pie
Step 1: Crush and Press the Cookie Base
Grab a bunch of graham crackers or your favorite cookies and pulverize them into fine crumbs. Mix these crumbs with sugar and melted butter until the mixture looks like damp beach sand. Press this delightful mixture firmly into a 9-inch pie dish, covering the bottom and sides completely. Pop the crust into the refrigerator and let it chill for half an hour to set beautifully.
Step 2: Whip Up the Creamy Cheesecake Filling
In a spacious mixing bowl, cream together the cream cheese and peanut butter until they’re silky smooth. Sift in powdered sugar and a splash of vanilla extract, then blend until everything is perfectly combined. Gently fold in whipped cream, creating a light and airy filling that’ll make your taste buds dance.
Step 3: Layer the Cheesecake Magic
Scoop the luscious peanut butter cheesecake filling into the cooled crust. Use a spatula to spread it evenly, creating a picture-perfect surface that’s just begging to be decorated.
Step 4: Decorate with Monster Cookie Madness
Sprinkle an exciting array of toppings across the cheesecake:For an extra indulgent touch, drizzle some melted peanut butter over the top, creating delicious swirls of goodness.
Step 5: Chill and Set
Tuck the pie into the refrigerator and let it rest for at least 4 hours. This gives the filling time to firm up and the flavors to mingle and create pure magic.
Step 6: Slice and Celebrate
Pull out your masterpiece, slice it up, and prepare for a flavor explosion. Each bite promises a perfect blend of creamy cheesecake, peanut butter, and playful cookie crunch!
Pro Tips For A Smooth And Rich Monster Cookie Peanut Butter Cheesecake Pie
How To Store Monster Cookie Peanut Butter Cheesecake Pie Without Cracks
What Pairs Well With Monster Cookie Peanut Butter Cheesecake Pie
Tasty Variations Of Monster Cookie Peanut Butter Cheesecake Pie
Monster Cookie Peanut Butter Cheesecake Pie FAQs Made Easy
The pie gets its “monster” name from the colorful mix of M&Ms, chocolate chips, and oats sprinkled on top, just like classic monster cookies. These fun toppings add a playful and nostalgic touch to the traditional cheesecake.
Yes, you can substitute with reduced-fat versions. However, keep in mind that this might slightly change the texture and richness of the cheesecake. Full-fat ingredients typically provide the best creamy consistency and most robust flavor.
You’ll only need basic kitchen tools like a mixing bowl, electric mixer, spatula, and a 9-inch pie dish. No fancy equipment is required, making this recipe accessible for home bakers of all skill levels.
The mixture should be smooth, creamy, and free of lumps. When you fold in the whipped cream, it should look light and fluffy, with a consistent pale color throughout. Avoid overmixing to maintain the delicate texture.
Print
Monster Cookie Peanut Butter Cheesecake Pie Recipe
- Total Time: 4 hours 25 minutes
- Yield: 10 1x
Description
Monster cookie lovers rejoice! Peanut butter cheesecake pie blends irresistible flavors into one epic dessert sensation. Creamy cheesecake meets classic monster cookie charm, promising a delightful slice of pure indulgence you won’t be able to resist.
Ingredients
Crust Ingredients:
- 1 ½ cups (150 g) chocolate chip cookies or graham crackers, crushed
- ¼ cup (50 g) granulated sugar
- 6 tablespoons (85 g / 3 ounces) unsalted butter, melted
Cheesecake Filling Ingredients:
- 8 ounces (225 g) cream cheese, softened
- ¾ cup (190 g) creamy peanut butter
- ¾ cup (90 g) powdered sugar
- 1 teaspoon vanilla extract
- 1 cup (240 milliliters) heavy whipping cream, whipped to stiff peaks
Monster Cookie Topping Ingredients:
- ¼ cup (45 g) mini chocolate chips
- ¼ cup (45 g) mini M&Ms
- ¼ cup (20 g) rolled oats (optional)
- 2 tablespoons (30 milliliters) peanut butter, melted (optional drizzle)
Instructions
- Craft a robust base by pulverizing cookies into fine crumbs, then blend with melted butter and sugar until the mixture holds together like damp beach sand. Press the mixture firmly into a pie dish, ensuring an even, compact layer that reaches both bottom and sides.
- In a spacious mixing vessel, whip cream cheese and peanut butter until silky smooth, eliminating any potential lumps. Incorporate powdered sugar and vanilla, blending until the mixture achieves a luxurious, velvety consistency.
- Gently introduce whipped cream into the peanut butter mixture, folding with delicate motions to maintain the airy texture and prevent deflation of the delicate volume.
- Transfer the creamy filling into the chilled crust, using a spatula to create a perfectly leveled surface that promises an Instagram-worthy presentation.
- Lavishly adorn the pie’s surface with a vibrant constellation of mini chocolate chips, colorful M&Ms, and hearty oats, creating a playful, textural landscape that hints at the decadence within.
- Optional: Drizzle a gossamer web of melted peanut butter across the topping, adding an extra layer of indulgence and visual intrigue.
- Carefully nestle the pie into the refrigerator, allowing it to set and develop its full flavor profile for a minimum of four hours, or ideally overnight.
- When ready to serve, slice with a knife warmed under hot water to ensure clean, precise cuts that showcase the pie’s stunning layers and colorful topping.
Notes
- Select cookie or graham cracker crusts that complement the pie’s flavor, like chocolate or plain graham crackers for added texture and taste.
- Ensure cream cheese is at room temperature to prevent lumps and achieve a smooth, creamy filling that blends seamlessly.
- Use full-fat ingredients for the richest, most decadent cheesecake texture and intense peanut butter flavor.
- Customize toppings by experimenting with different candies, nuts, or drizzles to make the pie uniquely yours and keep it exciting.
- Prep Time: 25 minutes
- Cook Time: 4 hours
- Category: Desserts, Snacks
- Method: Mixing
- Cuisine: American
Nutrition
- Serving Size: 10
- Calories: 508
- Sugar: 32 g
- Sodium: 380 mg
- Fat: 36 g
- Saturated Fat: 16 g
- Unsaturated Fat: 20 g
- Trans Fat: 0 g
- Carbohydrates: 43 g
- Fiber: 2 g
- Protein: 9 g
- Cholesterol: 56 mg
James Mitchell
Founder & Recipe Developer
Expertise
Recipe Creation and Testing, Fusion Cuisine, Food Styling and Photography, Culinary Education
Education
Kendall College, Chicago, IL
The Culinary Institute of America, Hyde Park, NY
James Mitchell is the founder and fearless flavor explorer at Cooking Crusade. With a degree in Culinary Arts from Kendall College and advanced training in global gastronomy from The Culinary Institute of America, James has spent over a decade perfecting the art of recipe creation.
His background includes fine dining, private cheffing, and food styling, but his true joy comes from turning big ideas into doable recipes for home cooks. Every dish he shares is a mix of creativity, culture, and a little kitchen magic, built to bring excitement back to everyday meals.