
Irresistibly Rich No-Bake Brownie Bars Recipe – Ready in a Flash!
Chocolate lovers find pure bliss in these no-bake brownie bars that promise rich, decadent satisfaction without turning on the oven.
Sweet cravings meet instant gratification through a simple method that requires minimal effort.
Crafting a dessert so indulgent yet uncomplicated that anyone can master it quickly.
These bars blend deep cocoa flavors with smooth, creamy textures that melt effortlessly on your tongue.
Nuts and chocolate chips add delightful crunch and complexity to each irresistible bite.
Minimal ingredients and zero baking time make this recipe perfect for spontaneous dessert adventures.
Trust me, one taste will have everyone asking for your secret weapon in delectable treats.
Why No-Bake Brownie Bars Are Rich, Chewy, And Quick

Everything You Need For No-Bake Brownie Bars
Base Ingredients:Flavor Enhancers:Optional Add-Ins:Preparation Extras:How To Put Together No-Bake Brownie Bars Fast

Step 1: Soften Dates
Grab your dates and give them a warm bath. If they’re feeling a bit stiff, soak them in warm water for a quick 10-minute spa treatment. Gently drain and pat them dry with a soft towel.
Step 2: Crush Nutty Goodness
Fire up your food processor and toss in the walnuts or almonds. Pulse them until they’re beautifully ground – think sandy texture, not nut butter! You want a nice, crumbly consistency that’ll make your bars magical.
Step 3: Create Decadent Dough
Time to bring all the flavors together! Toss into the food processor:Blend everything until it transforms into a deliciously sticky dough. Feeling like the mixture is too dry? No worries! Add a tiny splash of water to help it come together.
Step 4: Chocolate Chip Magic
Feeling extra indulgent? Grab those mini chocolate chips and gently fold them into the dough by hand. Let them dance through the mixture!
Step 5: Pan Preparation
Grab an 8×8-inch baking dish and line it with parchment paper. Think of it like creating a cozy bed for your brownie bars. Press the dough evenly into the pan, smoothing it out with your hands or a trusty spatula.
Step 6: Optional Topping Extravaganza
Want to take these bars to the next level? Drizzle melted chocolate across the top. Feeling fancy? Sprinkle some chopped nuts or shredded coconut for that extra wow factor.
Step 7: Chill Out
Pop your creation into the refrigerator. Let it hang out and firm up for at least an hour. Patience is key!
Step 8: Slice and Enjoy
Remove your masterpiece from the pan. Slice into perfect bars. Devour immediately or store in the refrigerator or freezer for later snacking adventures.
Pro Tip: These bars are packed with natural goodness and will satisfy your chocolate cravings without any guilt!
Tips For The Best No-Bake Brownie Bar Texture
How To Store No-Bake Brownie Bars Without Drying Out
What Goes Well With No-Bake Brownie Bars
Flavor Options For No-Bake Brownie Bars
FAQs About No-Bake Brownie Bars
Yes! These no-bake brownie bars are packed with nutritious ingredients like dates, nuts, and cocoa powder. They’re naturally sweetened, gluten-free, and provide a good source of healthy fats and antioxidants.
If you have a nut allergy, substitute the walnuts or almonds with seeds like sunflower or pumpkin seeds. For the almond butter, use sunflower seed butter or another seed-based alternative.
When stored in an airtight container in the refrigerator, these brownie bars will stay fresh for up to 7-10 days. For longer storage, you can freeze them for up to 2 months.
You’ll need a food processor and an 8×8-inch baking pan. Parchment paper helps with easy removal, but isn’t absolutely necessary if you don’t have it.
Print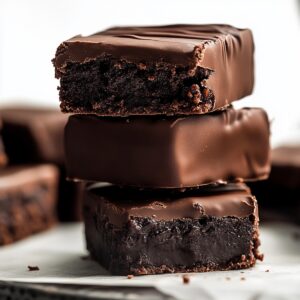
No-Bake Brownie Bars Recipe
- Total Time: 1 hour 10 minutes
- Yield: 12 1x
Description
Chocolate lovers will adore these delightful no-bake brownie bars, packed with rich cocoa and nutty goodness. Rich chocolate layers meld perfectly with smooth textures, creating an irresistible treat you can quickly prepare without turning on the oven.
Ingredients
Main Ingredients:
- 1 ½ cups (360 ml) pitted Medjool dates (softened if needed)
- 1 cup (240 ml) raw walnuts or almonds
- ⅓ cup (80 ml) unsweetened cocoa powder
- ¼ cup (60 ml) almond butter (or peanut butter)
Flavor Enhancers:
- 1 teaspoon (5 ml) vanilla extract
- ¼ teaspoon (1.25 ml) salt
- ¼ cup (60 ml) mini chocolate chips (optional)
Topping:
- 2 tablespoons (30 ml) melted dark chocolate
- Chopped nuts or shredded coconut for garnish
Instructions
- Hydrate the dates if they are not already soft by immersing them in warm water for a brief period. Thoroughly drain and pat them completely dry with a clean kitchen towel.
- Utilize a food processor to transform walnuts or almonds into a fine, consistent texture, being cautious not to over-process into a paste-like consistency.
- Combine softened dates, rich cocoa powder, creamy almond butter, aromatic vanilla extract, and a pinch of salt within the food processor. Pulse and blend until the ingredients meld into a cohesive, slightly tacky mixture. Adjust moisture by introducing minimal water if the dough appears excessively dry.
- For enhanced indulgence, gently incorporate mini chocolate chips into the dough, folding them through manually to ensure even distribution.
- Prepare an 8-inch baking dish by lining it with parchment paper, creating slight overhang for easy removal. Carefully transfer the dough and use clean hands or a silicone spatula to uniformly spread and compress the mixture.
- For an elegant finish, consider embellishing the surface with a delicate drizzle of melted chocolate and a sprinkle of chopped nuts or delicate coconut shavings.
- Transfer the prepared pan to the refrigerator and allow the bars to set and firm up for approximately one hour, ensuring a perfect texture.
- Once chilled, lift the bars from the pan using parchment paper edges. Slice into uniform rectangles and serve immediately. Preserve any remaining portions in an airtight container within the refrigerator or freezer.
Notes
- Swap dates with prunes or dried figs for a unique flavor twist that keeps the bars naturally sweet and binding.
- Customize the nut base by using cashews or pecans to create different nutty undertones and textures in your brownie bars.
- For gluten-free and vegan diets, ensure all ingredients like chocolate chips and nut butter are certified to meet dietary requirements.
- Reduce moisture by using very fresh, soft dates or lightly toasting nuts beforehand to enhance the overall richness and prevent soggy consistency.
- Prep Time: 10 minutes
- Cook Time: 1 hour
- Category: Desserts, Snacks
- Method: Blending
- Cuisine: American
Nutrition
- Serving Size: 12
- Calories: 180
- Sugar: 14g
- Sodium: 40mg
- Fat: 10g
- Saturated Fat: 1g
- Unsaturated Fat: 9g
- Trans Fat: 0g
- Carbohydrates: 20g
- Fiber: 3g
- Protein: 4g
- Cholesterol: 0mg
James Mitchell
Founder & Recipe Developer
Expertise
Recipe Creation and Testing, Fusion Cuisine, Food Styling and Photography, Culinary Education
Education
Kendall College, Chicago, IL
The Culinary Institute of America, Hyde Park, NY
James Mitchell is the founder and fearless flavor explorer at Cooking Crusade. With a degree in Culinary Arts from Kendall College and advanced training in global gastronomy from The Culinary Institute of America, James has spent over a decade perfecting the art of recipe creation.
His background includes fine dining, private cheffing, and food styling, but his true joy comes from turning big ideas into doable recipes for home cooks. Every dish he shares is a mix of creativity, culture, and a little kitchen magic, built to bring excitement back to everyday meals.