Dreamy Red Velvet Cake Balls Recipe: Bite-Sized Treats
Sweet memories of grandma’s kitchen spark when red velvet cake balls dance across my culinary imagination.
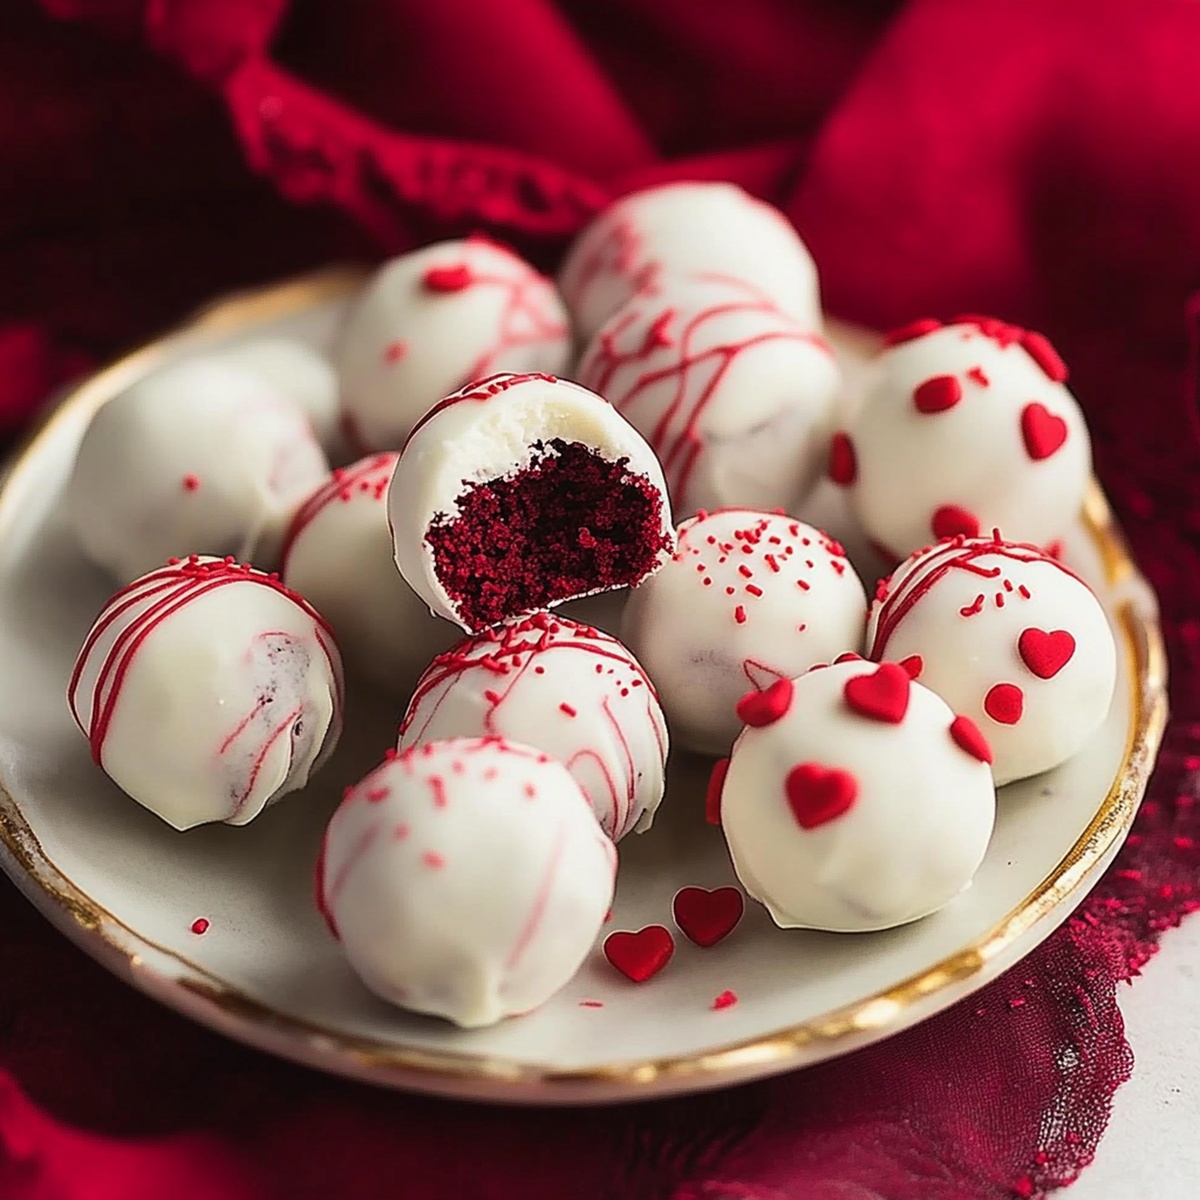
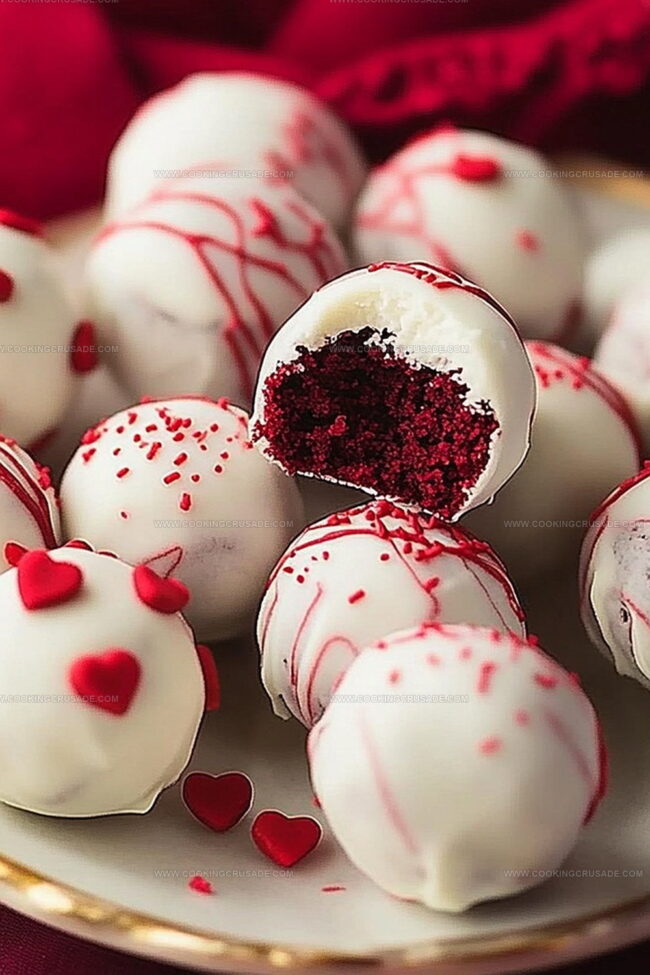
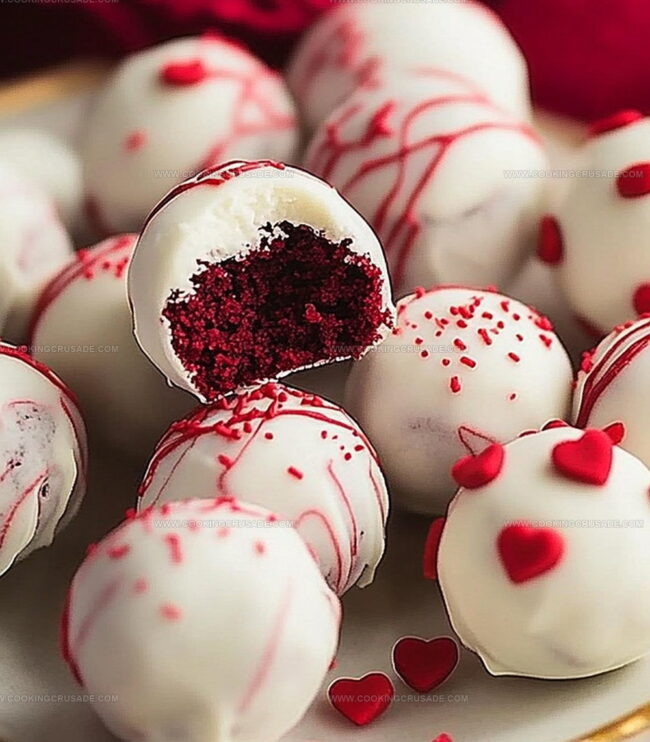
These delectable bite-sized treats combine rich chocolate undertones with vibrant crimson hues.
Soft cake crumbles meld seamlessly with creamy frosting, creating irresistible morsels that disappear quickly at gatherings.
Compact and elegant, they offer a perfect dessert for intimate celebrations or casual weekend indulgences.
Cream cheese brings a luxurious smoothness that complements the subtle cocoa notes.
Each miniature sphere promises a delightful explosion of flavor and texture.
You’ll find these little gems surprisingly simple to craft with just a few basic ingredients.
Let’s roll up our sleeves and create something magical that will impress every dessert enthusiast at the table.
Why Red Velvet Cake Balls Are So Irresistible
What You Need For Red Velvet Cake Balls
Cake Base:Cake Ball Binding:Coating and Decoration:Red Velvet Cake Balls Easy Recipe
Step 1: Prepare The Cake Base
Preheat the oven to 350 degrees Fahrenheit. Grab a rectangular baking pan and coat it with cooking spray. Follow the instructions on the red velvet cake mix package to create a delicious cake. Bake according to package directions. Once done, let the cake cool completely on a wire rack.
Step 2: Transform Cake Into Delightful Balls
Crumble the cooled cake into fine, delicate pieces inside a spacious mixing bowl. Add cream cheese frosting and mix thoroughly using your hands or a sturdy spoon. The mixture should stick together when gently pressed. Roll the mixture into small, uniform balls about the size of a golf ball. Place these delicate spheres on a parchment-lined baking sheet. Pop the tray into the freezer for 20-30 minutes to help them firm up.
Step 3: Create Chocolate Coating
Select white chocolate or candy melts for coating. Place chocolate in a microwave-safe bowl. Melt the chocolate in short 30-second bursts, stirring between each interval until smooth and glossy. If the chocolate seems too thick, mix in a touch of coconut oil to create a silky consistency.
Step 4: Dunk And Decorate
Remove cake balls from the freezer. Using a fork or dipping tool, carefully lower each ball into the melted chocolate. Gently tap to remove excess coating. Place the chocolate-covered balls back on the parchment paper. While the chocolate is still wet, add fun decorations:Step 5: Chill And Enjoy
Refrigerate the decorated cake balls for 15-20 minutes until the chocolate sets completely. Serve these delightful treats at parties, gatherings, or as a special sweet indulgence. Store in an airtight container in the refrigerator for up to five days.
Pro Tip: These cake balls make fantastic gifts or dessert table showstoppers. Get creative with your decorations and have fun in the kitchen!
Tips To Get Red Velvet Cake Balls Perfect
Storage Tips For Red Velvet Cake Balls
Pairing Ideas For Red Velvet Cake Balls
Red Velvet Cake Balls You Can Tweak
Common Questions About Red Velvet Cake Balls
Red velvet cake balls combine the rich, velvety texture of red velvet cake with a smooth chocolate coating. They’re bite-sized treats that pack all the delicious flavor of a full cake into a perfect handheld dessert that’s both elegant and fun to eat.
Absolutely! Homemade cream cheese frosting works great and can even enhance the flavor of your cake balls. Just ensure the frosting is thick enough to bind the cake crumbs together without making the mixture too wet.
Freezing the cake balls for 20-30 minutes before dipping is crucial. This helps them stay firm and hold their shape when coated in melted chocolate. Make sure they’re chilled but not completely frozen, which can cause cracking.
Try using different chocolate coatings like milk or dark chocolate, drizzle with contrasting chocolate, add festive sprinkles, or roll in crushed nuts. You can also color the chocolate coating or use edible glitter for special occasions.
Print
Red Velvet Cake Balls Recipe
- Total Time: 1 hour
- Yield: 24 1x
Description
Indulgent red velvet cake balls invite dessert enthusiasts into a world of rich, velvety bliss. Creamy chocolate coating and delicate crumbs combine for an irresistible treat you’ll savor with pure delight.
Ingredients
Cake Base:
- 1 box red velvet cake mix
- 3 eggs
- ⅓ cup vegetable oil
- 1 cup water
Frosting and Coating:
- ½ cup (120 milliliters) cream cheese frosting
- 12 ounces (340 grams) white chocolate or candy melts
- 1 teaspoon coconut oil
Decorative Toppings:
- Red sprinkles
- White sprinkles
- Crushed red velvet cake crumbs
- Dark chocolate drizzle
Instructions
- Prepare the red velvet cake foundation by mixing the ingredients according to package guidelines and baking in a rectangular pan, ensuring an even golden surface emerges from the oven.
- After allowing the cake to reach room temperature, meticulously crumble the entire cake into fine, uniform particles within a spacious mixing vessel.
- Incorporate cream cheese frosting into the cake crumbs, thoroughly blending until the mixture develops a cohesive texture that maintains its shape when gently compressed.
- Craft consistent, compact spheres approximately one inch in diameter, positioning each delicately on a parchment-lined tray prepared for chilling.
- Transfer the tray to the freezer, allowing the nascent cake spheres to solidify and maintain structural integrity for approximately half an hour.
- Melt chocolate or candy melts in a microwave-safe container, utilizing brief intervals and stirring periodically to achieve a smooth, glossy consistency.
- Enhance chocolate’s fluidity by introducing a small quantity of coconut oil if the mixture appears overly dense.
- Extract the chilled cake spheres and methodically immerse each into the molten chocolate, ensuring comprehensive coverage using a specialized dipping tool.
- Gently eliminate excess chocolate by delicately tapping, then position each coated sphere back onto the parchment surface.
- While the chocolate remains liquid, embellish with complementary decorations such as festive sprinkles, pulverized cake remnants, or elegant chocolate drizzles.
- Refrigerate the decorated spheres until the chocolate exterior solidifies completely, typically requiring 15-20 minutes.
- Serve immediately or preserve within an airtight container in the refrigerator, maintaining freshness for several days.
Notes
- Chill the cake thoroughly before crumbling to prevent moisture loss and ensure a compact texture.
- Use room temperature cream cheese frosting for easier mixing and better binding of cake crumbs.
- When dipping in chocolate, keep the melted coating at a consistent warm temperature to achieve a smooth, even coating.
- Test the cake ball mixture’s consistency by gently squeezing a small amount – it should hold together without crumbling.
- For gluten-free version, substitute regular cake mix with a gluten-free alternative and check all ingredient labels carefully.
- Create flavor variations by adding extracts like almond or peppermint to the cake ball mixture for unexpected depth.
- Prevent cake balls from developing cracks by ensuring they’re completely chilled before chocolate dipping and avoiding temperature shock.
- Use a chocolate dipping tool or fork with thin tines for more precise and cleaner chocolate coating technique.
- Prep Time: 30 minutes
- Cook Time: 30 minutes
- Category: Desserts, Snacks
- Method: Baking
- Cuisine: American
Nutrition
- Serving Size: 24
- Calories: 150
- Sugar: 15 g
- Sodium: 200 mg
- Fat: 7 g
- Saturated Fat: 3.5 g
- Unsaturated Fat: 2 g
- Trans Fat: 0 g
- Carbohydrates: 20 g
- Fiber: 0.5 g
- Protein: 2 g
- Cholesterol: 30 mg
James Mitchell
Founder & Recipe Developer
Expertise
Recipe Creation and Testing, Fusion Cuisine, Food Styling and Photography, Culinary Education
Education
Kendall College, Chicago, IL
The Culinary Institute of America, Hyde Park, NY
James Mitchell is the founder and fearless flavor explorer at Cooking Crusade. With a degree in Culinary Arts from Kendall College and advanced training in global gastronomy from The Culinary Institute of America, James has spent over a decade perfecting the art of recipe creation.
His background includes fine dining, private cheffing, and food styling, but his true joy comes from turning big ideas into doable recipes for home cooks. Every dish he shares is a mix of creativity, culture, and a little kitchen magic, built to bring excitement back to everyday meals.