
The Most Magical Red Velvet Cake Pops Recipe Ever
These whimsical red velvet cake pops dance between decadent dessert and playful treat.
Sweet crimson spheres capture imagination with their compact charm.
One bite unleashes rich cocoa and velvety smoothness that melts perfectly.
Compact and adorable, these miniature confections bring irresistible appeal to any gathering.
Small handheld delights create instant conversation and smiles among guests.
Creamy frosting and tender cake combine in a magical fusion that transforms simple ingredients into extraordinary bites.
Each pop promises a delightful journey through texture and flavor that you won’t want to miss.
Why Red Velvet Cake Pops Recipe Stands Out
What You’ll Use For Red Velvet Cake Pops Recipe
Cake Base Ingredients:Wet Ingredients:Frosting and Coating Ingredients:How To Make Red Velvet Cake Pops Recipe Step-By-Step
Step 1: Craft the Delectable Cake Base
Preheat the oven to 350°F (175°C). Prepare an 8-inch round cake pan with a light grease or parchment paper. In a spacious mixing bowl, combine the dry ingredients:In a separate bowl, whisk together the wet ingredients:Blend the wet and dry mixtures until silky smooth. Pour the vibrant batter into the prepared pan. Bake for 25-30 minutes, checking doneness with a toothpick. Let the cake cool completely.
Step 2: Whip Up Creamy Frosting Magic
Using an electric mixer, cream together:Gradually fold in powdered sugar and vanilla extract. Mix until the frosting becomes luxuriously smooth and fluffy.
Step 3: Transform Cake into Heavenly Bites
Crumble the cooled cake into fine, delicate crumbs. Slowly incorporate the cream cheese frosting, mixing until the mixture holds together perfectly. Roll the mixture into bite-sized spheres. Arrange the balls on a parchment-lined baking sheet. Chill in the refrigerator for an hour or freeze for 15-20 minutes.
Step 4: Chocolate Coating Spectacular
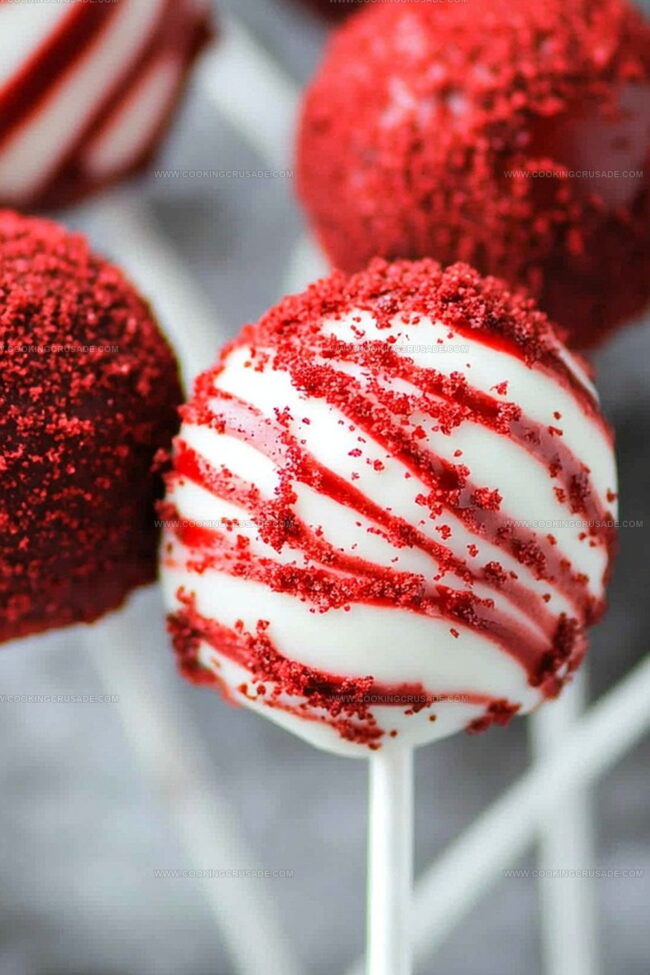
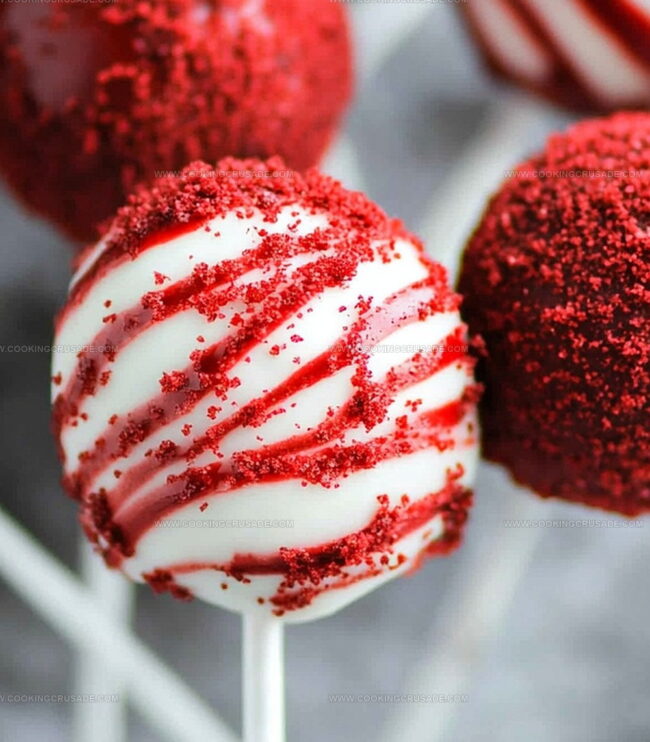
Melt white chocolate or candy melts in a microwave-safe bowl, stirring between 20-second intervals. Dip lollipop stick ends into the melted chocolate, then carefully insert into each cake ball. Submerge each pop entirely in the molten chocolate, gently removing excess. Position the coated pops upright on a cake pop stand or parchment paper.
Optional decorating ideas:Step 5: Serve and Celebrate
Allow the cake pops to set completely at room temperature or in the refrigerator. Arrange on a beautiful platter and watch as everyone’s eyes light up with pure joy!
Helpful Tips For Red Velvet Cake Pops Recipe
Best Way To Store Red Velvet Cake Pops Recipe
Red Velvet Cake Pops Recipe Pairing Ideas
Fun Changes For Red Velvet Cake Pops Recipe
Questions About Red Velvet Cake Pops Recipe
Red velvet cake has a unique, subtle cocoa flavor with a distinctive red color. The combination of buttermilk, vinegar, and a small amount of cocoa powder creates its signature tangy taste and vibrant red hue.
Absolutely! You can use a styrofoam block, an upside-down colander, or even a tall glass with holes to hold your cake pops while they set. The key is finding something that keeps them upright and allows the chocolate coating to dry evenly.
Vinegar helps activate the baking soda, creating a more tender and light cake texture. It also enhances the cake’s subtle tanginess and helps develop the classic red velvet flavor profile.
Yes! Chilling the cake balls helps them firm up, making them easier to dip and less likely to fall apart in the melted chocolate. Cold cake balls create smoother, more professional-looking cake pops.
Print
Red Velvet Cake Pops Recipe
- Total Time: 2 hours
- Yield: 24 1x
Description
Red velvet cake pops weave magic into bite-sized dessert perfection, blending classic Southern charm with modern sweet indulgence. Rich crimson cake crumbles dance with creamy frosting, creating irresistible treats you cannot resist savoring in one delightful pop.
Ingredients
Main Ingredients:
- 1 ¼ cups (296 milliliters) all-purpose flour
- 1 cup (200 grams) granulated sugar
- 1 large egg
- ½ cup (120 milliliters) vegetable oil
- ½ cup (120 milliliters) buttermilk
Flavoring and Coloring Ingredients:
- 2 tablespoons unsweetened cocoa powder
- 1 tablespoon red food coloring
- 1 teaspoon vanilla extract
- 1 teaspoon distilled white vinegar
Binding and Coating Ingredients:
- ½ teaspoon baking soda
- ½ teaspoon salt
- 4 ounces (113 grams) cream cheese, softened
- 2 tablespoons unsalted butter, softened
- 1 cup (120 grams) powdered sugar
- ½ teaspoon vanilla extract
- 12 ounces (340 grams) white chocolate or candy melts
- 2 ounces (57 grams) dark chocolate or colored candy melts (optional, for drizzling)
- Sprinkles (optional)
Instructions
- Meticulously prepare the oven environment by heating to 350F (175C) and preparing an 8-inch round cake pan with protective lining.
- Create a delicate dry mixture by sifting flour, sugar, cocoa powder, baking soda, and salt into a spacious mixing vessel.
- Craft a vibrant liquid blend by whisking egg, vegetable oil, buttermilk, red food coloring, vanilla extract, and vinegar until harmoniously combined.
- Gently incorporate wet ingredients into dry components, stirring until a smooth, uniform batter emerges, then transfer to the prepared pan.
- Bake the crimson confection for 25-30 minutes, verifying doneness with a toothpick test. Allow the cake to cool completely to room temperature.
- Whip cream cheese and butter together until achieving a silky, cloud-like consistency.
- Gradually fold powdered sugar and vanilla extract into the creamy base, mixing until perfectly integrated.
- Transform the cooled cake into fine, delicate crumbs within a generous mixing bowl.
- Introduce cream cheese frosting incrementally, blending until the mixture holds its shape without excessive moisture.
- Expertly shape the mixture into uniform 1-inch spheres, positioning them on a parchment-lined baking sheet.
- Chill the formed balls in the refrigerator for one hour or briefly freeze for 15-20 minutes to firm their structure.
- Melt white chocolate or candy melts using precise microwave intervals, stirring until achieving a glossy, smooth texture.
- Dip lollipop stick tips into melted chocolate, then carefully anchor them midway into each cake ball.
- Submerge each cake pop completely in the melted coating, delicately removing excess chocolate with gentle tapping.
- Position the coated pops upright in a designated stand or on parchment paper.
- Optional: Embellish with dark chocolate drizzles or sprinkle decorations before the coating solidifies.
- Allow cake pops to set thoroughly at ambient temperature or within the refrigerator before serving.
Notes
- Chill the cake thoroughly before crumbling to ensure easier handling and more compact cake balls.
- Use room temperature cream cheese and butter for smoother, lump-free frosting that blends perfectly with cake crumbs.
- Adjust food coloring quantity for a deeper or lighter red tone, keeping the classic vibrant red velvet color in mind.
- Keep cake pops cold to maintain structural integrity and prevent chocolate coating from cracking during decoration or serving.
- Prep Time: 30 minutes
- Cook Time: 30 minutes
- Category: Desserts, Snacks
- Method: Baking
- Cuisine: American
Nutrition
- Serving Size: 24
- Calories: 190
- Sugar: 15 g
- Sodium: 120 mg
- Fat: 9 g
- Saturated Fat: 3 g
- Unsaturated Fat: 6 g
- Trans Fat: 0 g
- Carbohydrates: 27 g
- Fiber: 0.5 g
- Protein: 2 g
- Cholesterol: 20 mg
James Mitchell
Founder & Recipe Developer
Expertise
Recipe Creation and Testing, Fusion Cuisine, Food Styling and Photography, Culinary Education
Education
Kendall College, Chicago, IL
The Culinary Institute of America, Hyde Park, NY
James Mitchell is the founder and fearless flavor explorer at Cooking Crusade. With a degree in Culinary Arts from Kendall College and advanced training in global gastronomy from The Culinary Institute of America, James has spent over a decade perfecting the art of recipe creation.
His background includes fine dining, private cheffing, and food styling, but his true joy comes from turning big ideas into doable recipes for home cooks. Every dish he shares is a mix of creativity, culture, and a little kitchen magic, built to bring excitement back to everyday meals.