
Nostalgic School Cafeteria Pizza Recipe: Relive Lunch Magic!
School cafeteria pizza brings back waves of nostalgic memories for many.
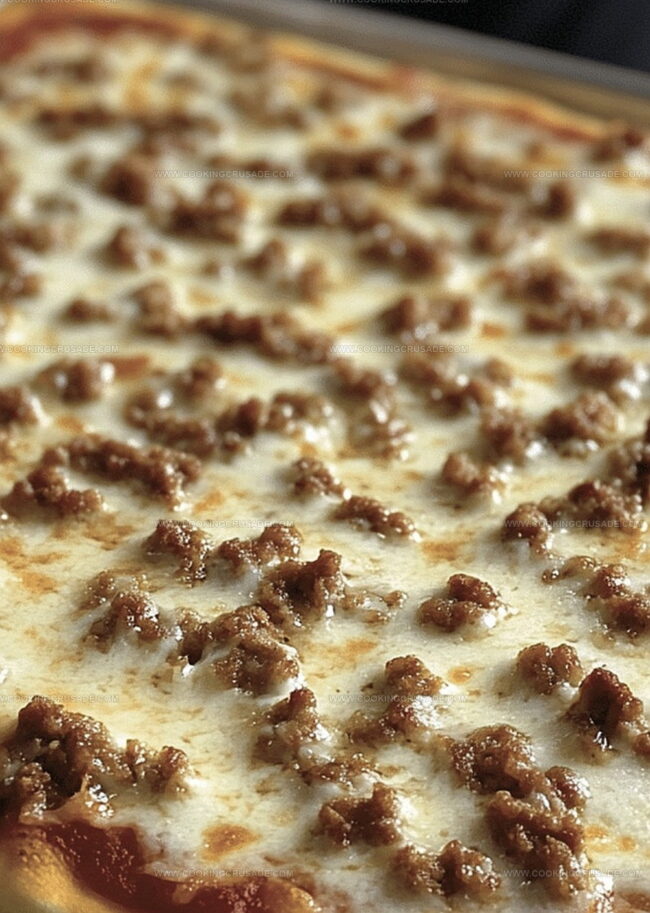
Those rectangular slices dripping with melted cheese transport you instantly to childhood lunch lines.
Everyone remembers that distinct rectangular shape and slightly crispy crust unique to institutional kitchens.
cafeteria workers seemed to possess magical skills crafting these simple yet irresistible meals.
Classic comfort food rarely gets more straightforward or delicious than these beloved lunchtime staples.
Recreating this beloved dish means reconnecting with fond memories and enjoying a taste of simplicity.
You can now reimagine those cherished lunch moments right in your own kitchen.
Why Everyone Talks About School Cafeteria Pizza
What You’ll Need For School Cafeteria Pizza
Dry Ingredients:Wet Ingredients:Topping Ingredients:How To Make School Cafeteria Pizza At Home
Step 1: Create Magical Dough Base
Grab a big mixing bowl and toss in flour, milk powder, sugar, yeast, and salt. Pour warm water and vegetable oil into the dry ingredients. Stir everything until you get a slightly sticky batter that looks ready for adventure. Cover the bowl with a clean cloth and let the dough chill for 20 minutes while the yeast works its magic.
Step 2: Prepare Baking Station
Crank up your oven to a toasty 475F. Grab a half-sheet pan and give it a generous coating of shortening. Sprinkle cornmeal across the surface like you’re creating a delicious landscape.
Step 3: Spread and Pre-Bake Crust
Dump the rested dough onto the pan. Use your fingers or a spatula to spread the dough evenly, covering every inch of the pan. Pro tip: If the dough gets clingy, just oil up your hands. Let the dough hang out for 10 more minutes, then slide it into the oven. Bake for 8-10 minutes until it’s set but not turning brown.
Step 4: Deck Out Your Pizza
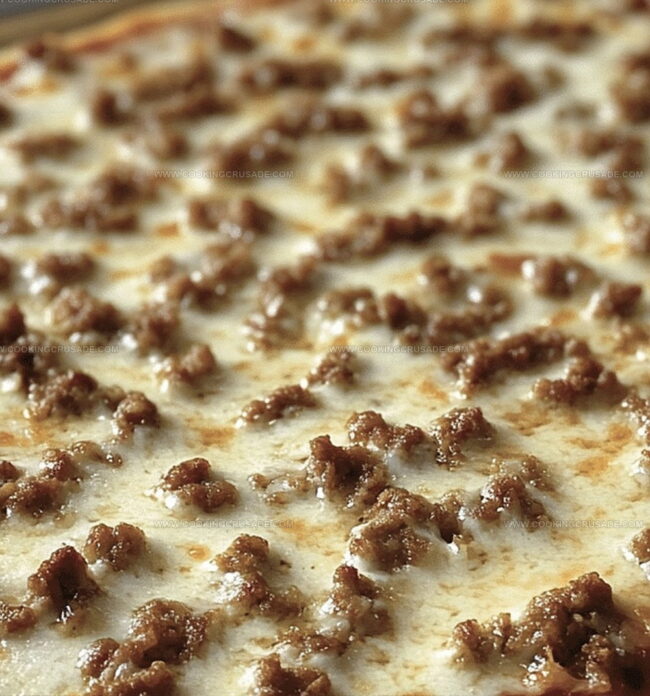
Pull the crust out of the oven. Time to dress it up! Spread pizza sauce across the surface, leaving a tiny border around the edges. Then shower the sauce with:Step 5: Final Bake
Slide the pizza back into the oven. Bake for 10-15 minutes until the cheese becomes a melty wonderland and the crust turns a gorgeous golden color.
Step 6: Slice and Serve
Carefully remove the pizza from the oven. Let it cool down for a moment. Slice into classic rectangular cafeteria-style pieces. Serve while it’s hot and watch everyone’s eyes light up!
School Cafeteria Pizza Prep Tips
Store And Reheat School Cafeteria Pizza
What To Serve With School Cafeteria Pizza
School Cafeteria Pizza With A Twist
FAQs For School Cafeteria Pizza
Dry milk powder adds richness and helps create a softer, more tender crust. It also enhances the bread’s browning and provides extra nutrients to the pizza dough.
Yes, you can prepare the dough earlier and let it rise in the refrigerator for up to 24 hours. Just bring it to room temperature before spreading it in the pan.
This recipe mimics the nostalgic school cafeteria-style pizza with its rectangular shape, simple sauce, and straightforward preparation method. It’s designed to recreate that classic lunch room pizza experience many people remember from childhood.
Absolutely! The first rest allows the yeast to activate, while the second rest helps the dough relax and makes it easier to spread in the pan. These resting periods contribute to a better texture and flavor in the final crust.
Print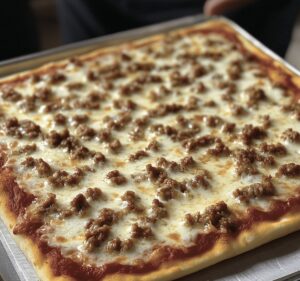
School Cafeteria Pizza Recipe
- Total Time: 50-55 minutes
- Yield: 40 1x
Description
School cafeteria pizza brings nostalgic comfort with its classic crispy crust and melted cheese blend. Reminiscent of childhood lunches, this simple recipe delivers delicious memories you can recreate at home.
Ingredients
Main Ingredients (Crust):
- 2 ½ cups all-purpose flour
- ¾ cup instant non-fat dry milk powder
- 1 ¼ teaspoons active dry yeast
- 1 teaspoon salt
- 1 ½ teaspoons vegetable oil
- 2 tablespoons granulated sugar
Liquid Ingredients:
- 1 ½ cups warm water (about 110°F/43°C)
Preparation and Pan Ingredients:
- 1 tablespoon shortening (for greasing the pan)
- 1 ½ tablespoons cornmeal (for dusting the pan)
Sauce Ingredients:
- 1 ⅓ cups pizza sauce (store-bought or homemade)
Cheese and Topping Ingredients:
- 2 cups shredded mozzarella cheese
- Optional: pepperoni slices
- Optional: cooked ground beef
- Optional: diced bell peppers
- Optional: other preferred toppings
Instructions
- Create a versatile dough mixture by blending flour, dry milk powder, sugar, yeast, and salt in a spacious mixing vessel. Introduce warm water and vegetable oil, stirring until a cohesive, slightly tacky batter emerges. Allow the mixture to rest under a clean cloth for 20 minutes, enabling yeast activation and flavor development.
- Heat the oven to a robust 475F (246C). Thoroughly coat a half-sheet pan with shortening, then dust evenly with cornmeal to prevent sticking and add a subtle textural crunch.
- Transfer the rested dough onto the prepared baking surface. Gently manipulate the dough with fingertips or a spatula, spreading it uniformly across the entire pan. If the dough proves challenging to handle, lightly oil hands to minimize adhesion. Allow an additional 10-minute resting period before pre-baking the crust for 8-10 minutes until it sets but maintains a pale complexion.
- Extract the partially baked crust from the oven. Distribute pizza sauce across the surface, maintaining a narrow perimeter around the edges. Generously layer shredded mozzarella cheese over the sauce. Incorporate any preferred additional toppings for personalized flavor enhancement.
- Reintroduce the pizza to the oven, continuing baking for 10-15 minutes. Monitor until the cheese transforms into a molten, bubbling layer and the crust achieves a delicate golden hue.
- Carefully remove the pizza from the oven, allowing a brief cooling interval. Slice into classic rectangular portions reminiscent of traditional school cafeteria style. Serve immediately while warm and inviting.
Notes
- Achieve the perfect dough consistency by adjusting water slightly if it feels too dry or wet, ensuring a smooth, slightly sticky texture that spreads easily.
- Enhance flavor by experimenting with different cheese blends like adding cheddar or provolone alongside mozzarella for a more complex taste profile.
- Prevent sticky dough by using oil-coated hands or a spatula when spreading, making the process smoother and more manageable during preparation.
- Create gluten-free alternatives by substituting regular flour with a high-quality gluten-free flour blend, maintaining similar texture and taste for those with dietary restrictions.
- Prep Time: 30 minutes
- Cook Time: 20-25 minutes
- Category: Lunch, Dinner, Snacks
- Method: Baking
- Cuisine: American
Nutrition
- Serving Size: 40
- Calories: 150
- Sugar: 2 g
- Sodium: 300 mg
- Fat: 4 g
- Saturated Fat: 2 g
- Unsaturated Fat: 1.5 g
- Trans Fat: 0 g
- Carbohydrates: 23 g
- Fiber: 1 g
- Protein: 6 g
- Cholesterol: 10 mg
James Mitchell
Founder & Recipe Developer
Expertise
Recipe Creation and Testing, Fusion Cuisine, Food Styling and Photography, Culinary Education
Education
Kendall College, Chicago, IL
The Culinary Institute of America, Hyde Park, NY
James Mitchell is the founder and fearless flavor explorer at Cooking Crusade. With a degree in Culinary Arts from Kendall College and advanced training in global gastronomy from The Culinary Institute of America, James has spent over a decade perfecting the art of recipe creation.
His background includes fine dining, private cheffing, and food styling, but his true joy comes from turning big ideas into doable recipes for home cooks. Every dish he shares is a mix of creativity, culture, and a little kitchen magic, built to bring excitement back to everyday meals.