
The Most Fluffy Strawberry Shortcake Pudding Cups Recipe
Sweet memories dance through my kitchen whenever I whip up this delightful strawberry shortcake pudding cups dessert that combines childhood nostalgia with creamy indulgence.
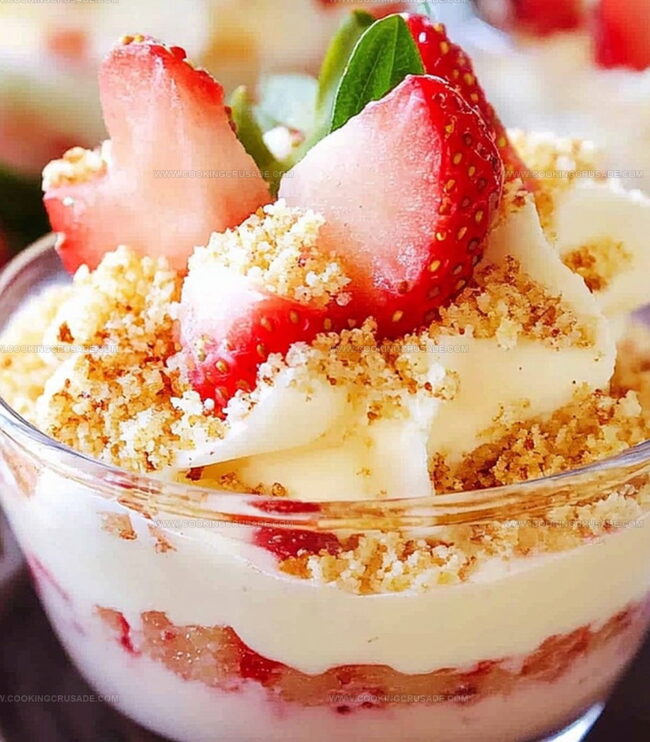
Layers of buttery crumbled biscuits nestled between luscious vanilla custard and fresh, ruby-red strawberries.
Each spoonful promises a delicate balance of textures that melt softly against your palate.
Summer picnics and lazy afternoon treats inspired this simple yet elegant dessert design.
Crisp shortcake crumbles provide a delightful crunch that contrasts beautifully with silky smooth pudding layers.
The bright, fragrant strawberries bring natural sweetness and vibrant color to every serving.
One bite transports you to sunny afternoons filled with joy and delectable comfort.
Let’s create a dessert that turns an ordinary moment into something spectacular!
Why Strawberry Shortcake Pudding Cups Are A Sweet Favorite

Everything You Need For Strawberry Shortcake Pudding Cups
Pudding Base:Cream Ingredients:Fruit Layer:Cake and Topping Components:Quick Steps To Make Strawberry Shortcake Pudding Cups
Step 1: Whip Up Dreamy Vanilla Pudding
In a medium bowl, whisk together:Stir until smooth and silky. Pop it in the refrigerator for a quick 5-minute chill. In another bowl, grab your electric mixer and whip:Beat until fluffy peaks stand tall. Gently fold the whipped cream into the pudding, creating a cloud-like mixture that’ll make taste buds dance.
Step 2: Transform Strawberries into Sweet Magic
Grab a bowl and toss together:Let the berries sit and get juicy for 10 minutes, allowing the flavors to mingle and create a luscious strawberry sauce.
Step 3: Build Your Pudding Masterpiece
Grab clear glasses or mason jars. Start layering your delightful creation:Repeat these layers until your cups are bursting with goodness, making sure to finish with a strawberry flourish.
Step 4: Create the Crowning Glory
Top each pudding cup with:Serve immediately and watch eyes light up with pure joy!
Helpful Tricks For Strawberry Shortcake Pudding Cups
Best Way To Store Strawberry Shortcake Pudding Cups
Yummy Things To Serve With Strawberry Shortcake Pudding Cups
Fun Ideas To Change Up Strawberry Shortcake Pudding Cups
FAQs On Strawberry Shortcake Pudding Cups
This pudding cup version transforms the classic dessert into a layered, portable treat that combines the same delicious flavors in a creamy, easy-to-serve format.
Fresh strawberries work best for optimal flavor and texture. Frozen strawberries can be used but might release more liquid, potentially making the layers slightly soggy.
You can assemble the cups up to 4-6 hours before serving, keeping them refrigerated. This makes them perfect for preparing ahead of time for parties or gatherings.
Macerating helps release the strawberries’ natural juices and enhances their sweetness, creating a more intense flavor in the dessert. While optional, it significantly improves the overall taste of the pudding cups.
Print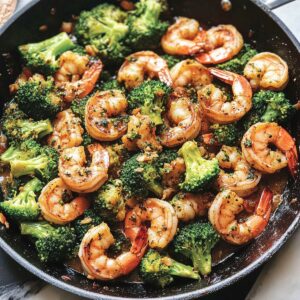
Garlic Butter Shrimp And Broccoli Skillet Recipe
- Total Time: 20 minutes
- Yield: 4 1x
Description
Garlic butter shrimp and broccoli skillet delivers a quick, restaurant-worthy meal packed with bold flavors and simple ingredients. Sizzling shrimp and crisp broccoli combine in a silky butter sauce that draws you into a delightful culinary experience.
Ingredients
Main Proteins and Vegetables:
- 1 pound (1 lb) shrimp, peeled and deveined
- 2 cups broccoli florets
Fats and Oils:
- 3 tablespoons (3 tbsp) butter
- 2 tablespoons (2 tbsp) olive oil
Seasonings and Flavor Enhancers:
- 4 garlic cloves, minced
- ½ teaspoon (½ tsp) smoked paprika
- ¼ teaspoon (¼ tsp) red pepper flakes (optional)
- Salt, to taste
- Black pepper, to taste
- 1 tablespoon (1 tbsp) lemon juice (from ½ lemon)
- 1 tablespoon (1 tbsp) fresh parsley, chopped (for garnish)
Instructions
- Carefully pat the shrimp dry using paper towels, then generously season with salt, cracked black pepper, and a sprinkle of smoky paprika for enhanced flavor complexity.
- Warm olive oil in a spacious skillet over medium heat, introducing broccoli florets with a delicate salt dusting. Gently sauté the verdant vegetable, rotating periodically, until achieving a vibrant green color with slight tenderness, approximately 4-5 minutes. Transfer the perfectly cooked broccoli to a separate plate.
- Utilizing the same skillet, drizzle additional olive oil and melt a portion of butter, creating a golden cooking surface. Introduce seasoned shrimp, allowing them to dance across the pan for roughly 2 minutes per side until transforming into a beautiful pink hue and becoming translucent. Carefully extract the shrimp and reserve.
- Reduce the skillet’s temperature to a gentle medium-low, melting the remaining butter. Incorporate finely minced garlic and optional red pepper flakes, releasing their aromatic essence for approximately 60 seconds.
- Reunite the sautéed shrimp and broccoli within the fragrant skillet, gently coating each morsel with the luxurious garlic butter sauce. Brighten the dish with a fresh squeeze of zesty lemon juice, delicately stirring to harmonize the flavors.
- Present the skillet immediately, adorned with freshly chopped parsley, ready to be savored alongside your preferred accompaniments.
Notes
- Maximize shrimp flavor by thoroughly patting them dry before seasoning, ensuring a perfect sear and preventing soggy texture.
- Adjust cooking time for broccoli based on preferred tenderness; crisp-tender means slightly crunchy with a vibrant green color.
- Use high-quality butter and fresh garlic for an intense, rich flavor profile that elevates the entire dish.
- Customize the recipe for different dietary needs by substituting shrimp with tofu or chicken, and using gluten-free alternatives if required.
- Prep Time: 10 minutes
- Cook Time: 10 minutes
- Category: Lunch, Dinner
- Method: Sautéing
- Cuisine: American
Nutrition
- Serving Size: 4
- Calories: 285
- Sugar: 2 g
- Sodium: 600 mg
- Fat: 18 g
- Saturated Fat: 7 g
- Unsaturated Fat: 9 g
- Trans Fat: 0 g
- Carbohydrates: 8 g
- Fiber: 3 g
- Protein: 24 g
- Cholesterol: 220 mg
James Mitchell
Founder & Recipe Developer
Expertise
Recipe Creation and Testing, Fusion Cuisine, Food Styling and Photography, Culinary Education
Education
Kendall College, Chicago, IL
The Culinary Institute of America, Hyde Park, NY
James Mitchell is the founder and fearless flavor explorer at Cooking Crusade. With a degree in Culinary Arts from Kendall College and advanced training in global gastronomy from The Culinary Institute of America, James has spent over a decade perfecting the art of recipe creation.
His background includes fine dining, private cheffing, and food styling, but his true joy comes from turning big ideas into doable recipes for home cooks. Every dish he shares is a mix of creativity, culture, and a little kitchen magic, built to bring excitement back to everyday meals.