Festive Striped Peppermint Sandwich Cookies Recipe for Winter Joy
Sweet memories dance around these striped peppermint sandwich cookies that remind me of cozy winter afternoons.
Crisp edges and creamy centers promise delightful moments of pure indulgence.
My grandmother’s kitchen always smelled magical when she baked similar treats during holiday seasons.
Delicate peppermint swirls peek through buttery layers, creating visual magic that makes mouths water instantly.
Soft vanilla cookies embrace rich cream filling with delicate peppermint notes that spark joyful celebrations.
Homemade comfort arrives in each carefully crafted bite, connecting generations through shared culinary love.
You might find yourself falling head over heels for this irresistible seasonal delight.
Grab a plate and let the festive magic begin!
Why Peppermint Sandwich Cookies Are So Refreshing

What Makes These Cookies Bright and Bold
Cookie Base Ingredients:Filling Ingredients:Decoration Ingredient:Steps for Perfect Swirls and Layers

Step 1: Create Delightful Dough
Grab a spacious mixing bowl and whip the butter and sugar until they transform into a fluffy cloud. Crack in the egg, then sprinkle vanilla and peppermint extracts, blending everything smoothly.
Whisk these dry ingredients in a separate bowl, then gently fold into the creamy mixture until a soft dough emerges.
Split the dough into two portions. Massage red gel food coloring into one half, kneading until the color spreads evenly like a vibrant sunset.
Step 2: Craft Stunning Stripes
Roll out both the crimson and plain doughs into rectangular shapes, ensuring they’re equally thin.
Carefully layer the red dough atop the plain dough, then softly press with a rolling pin to unite them.
Slice the dough into slender strips. Alternate and stack these strips, flipping every other one to create a mesmerizing striped pattern. Gently press the strips together.
Tuck the dough into the refrigerator for a cool 30-minute nap.
Step 3: Bake to Perfection
Warm up the oven to 350F (175C). Line baking sheets with parchment paper.
Carve the chilled dough into delicate rounds. Arrange on the baking sheets, leaving breathing room between each cookie.
Bake for 8-10 minutes until the edges look just set. Let them rest and cool completely on a wire rack.
Step 4: Whip Up Creamy Filling
Beat butter until it becomes silky smooth. Gradually shower in powdered sugar and peppermint extract.
Splash in heavy cream, one tablespoon at a time, until the filling reaches a dreamy, spreadable consistency.
Step 5: Assemble Magical Cookies
Spread a generous layer of peppermint filling on one cookie’s flat side. Crown with another cookie to create a delectable sandwich.
Optional: Roll the cookie edges in crushed peppermint candies for an extra festive touch.
Tips for Flavor and Presentation
Store to Maintain Texture and Coolness
Pair With Hot Sips or Chilly Drinks
Fun Flavor Combos and Decorations
Peppermint Cookie Questions Resolved
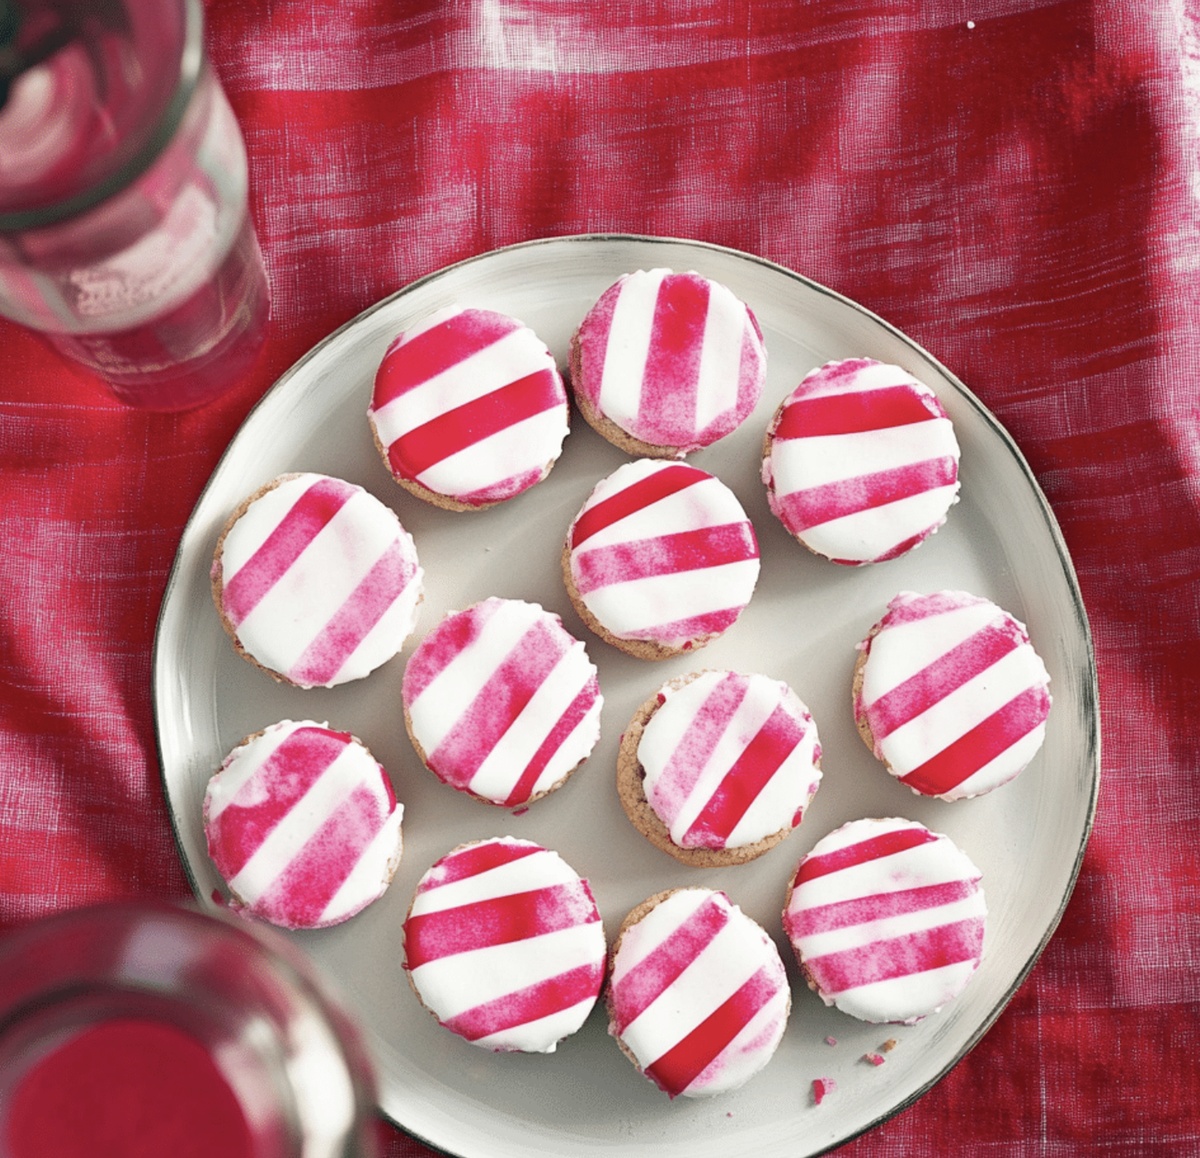
The striped dough technique creates a beautiful red and white swirled pattern that looks professionally made, making these cookies stand out from typical sandwich cookies.
Yes! You can prepare the dough and refrigerate it for up to 3 days before baking. This makes the recipe great for advance preparation and saves time during busy holiday seasons.
Not at all! The technique is simpler than it looks. By carefully stacking and alternating colored dough strips, even beginner bakers can achieve a stunning striped design with some patience.
Absolutely! These peppermint sandwich cookies are perfect for holiday gifts. They look impressive, taste delicious, and have a festive red and white color scheme that makes them ideal for Christmas or winter celebrations.
Print
Striped Peppermint Sandwich Cookies Recipe
- Total Time: 1 hour 10 minutes
- Yield: 24 1x
Description
Festive Peppermint Sandwich Cookies blend classic holiday charm with irresistible sweet-minty flavors that dance across your palate. Crisp, delicate cookie shells cradle rich peppermint cream, promising delightful moments of seasonal indulgence you’ll savor with pure joy.
Ingredients
Cookies:
- 1 cup (227 grams) unsalted butter, softened
- 1 cup (200 grams) granulated sugar
- 1 large egg
- 1 teaspoon vanilla extract
- ½ teaspoon peppermint extract
- 2 ½ cups (313 grams) all-purpose flour
- ½ teaspoon baking powder
- ¼ teaspoon salt
- Red gel food coloring
Filling:
- ½ cup (114 grams) unsalted butter, softened
- 2 cups (240 grams) powdered sugar
- ½ teaspoon peppermint extract
- 3 tablespoons heavy cream (as needed for consistency)
Garnish:
- Crushed peppermint candies (optional)
Instructions
- Craft the Dough Base: Cream together butter and sugar until airy and whipped. Incorporate egg, vanilla, and peppermint extracts, blending thoroughly. Sift flour, baking powder, and salt in a separate vessel, then gradually fold into the wet mixture until a cohesive dough emerges.
- Create Dramatic Striped Pattern: Partition dough into two equal portions. Infuse one section with vibrant red gel coloring, kneading until uniformly pigmented. Roll both color variants into thin rectangular sheets with consistent thickness.
- Construct Layered Design: Carefully overlay plain and crimson dough layers. Gently compress with rolling pin to fuse sections. Slice into precise, slender strips and interweave strategically, alternating colors to generate mesmerizing striped configuration.
- Chill and Prepare: Refrigerate layered dough for approximately half an hour to solidify structure. Preheat oven to moderate temperature.
- Slice and Bake: Extract chilled dough and cut into delicate rounds. Arrange on parchment-lined baking sheets, maintaining adequate spacing. Bake until edges turn golden and firm.
- Whip Decadent Filling: Transform butter into silky smooth base. Gradually integrate powdered sugar and peppermint extract. Adjust consistency with measured cream splashes until filling reaches perfect spreadable texture.
- Assemble Elegant Sandwich Cookies: Generously spread peppermint cream between two complementary cookie surfaces. Optional: Embellish edges with crushed peppermint candy for additional festive flair.
Notes
- Ensure butter is softened at room temperature for easier mixing and a smoother cookie dough texture.
- Use gel food coloring for vibrant, even color without altering the dough’s consistency.
- Chill the dough thoroughly to prevent spreading and maintain the precise striped pattern during baking.
- For gluten-free variations, substitute all-purpose flour with a 1:1 gluten-free baking blend.
- Work quickly when stacking and pressing dough strips to maintain clean, crisp stripe definition.
- Line baking sheets with parchment paper to prevent sticking and ensure even browning.
- Rotate baking sheets midway through cooking for uniform color and texture.
- Store cookies in an airtight container between layers of parchment paper to preserve crispness.
- Create dairy-free filling by using plant-based butter and coconut cream alternatives.
- Use a sharp, thin knife for precise cookie slicing to maintain uniform thickness.
- Allow cookies to cool completely before filling to prevent filling from melting.
- Experiment with different extract flavors like almond or orange for unique variations.
- Prep Time: 10 minutes
- Cook Time: 30 minutes
- Category: Desserts, Snacks
- Method: Baking
- Cuisine: American
Nutrition
- Serving Size: 24
- Calories: 150
- Sugar: 10 g
- Sodium: 50 mg
- Fat: 7 g
- Saturated Fat: 4 g
- Unsaturated Fat: 3 g
- Trans Fat: 0 g
- Carbohydrates: 20 g
- Fiber: 0 g
- Protein: 1 g
- Cholesterol: 20 mg
James Mitchell
Founder & Recipe Developer
Expertise
Recipe Creation and Testing, Fusion Cuisine, Food Styling and Photography, Culinary Education
Education
Kendall College, Chicago, IL
The Culinary Institute of America, Hyde Park, NY
James Mitchell is the founder and fearless flavor explorer at Cooking Crusade. With a degree in Culinary Arts from Kendall College and advanced training in global gastronomy from The Culinary Institute of America, James has spent over a decade perfecting the art of recipe creation.
His background includes fine dining, private cheffing, and food styling, but his true joy comes from turning big ideas into doable recipes for home cooks. Every dish he shares is a mix of creativity, culture, and a little kitchen magic, built to bring excitement back to everyday meals.